Ever fancied making a beautiful homemade quilt, full of your favourite patterns, colours and fabrics, but assumed it would take so long that there was no point starting? Well, in a brand new book, Quick & Easy Quilts, Lynne Goldsworthy shares a stunning collection of projects that you can run up on your sewing machine in record time: some can even be done in a weekend.
And in a four-week series, we will be sharing some of Lynne’s most accessible projects, starting with this rainbow leaves runner.
Rainbow Leaves Runner
This attractive runner is created using fusible web to make the orange peel or leaf shapes. A white background gives a lovely fresh and contemporary look to the design. The shapes are quick and easy to cut using a dinner plate as a guideline and a rotary cutter. This avoids tracing templates and careful scissor cutting, which can take much longer.
Coloured print fabrics for leaves: fifty-seven 5in squares of different fabrics
White fabric: 2 ¼ yds (2m)
Backing fabric: 2 ¾ yds (2.5m)
Wadding: 33in x 97in (85cm x 245cm)
Binding fabric: ½ yd (0.5m)
Fusible web: 2 ¾ yds (2.5m) of 18in (46cm) wide
Dinner plate: approx. 10in (25.5cm) diameter
Zigzag blade for rotary cutter (optional)
Suitable piecing and quilting threads
Finished size: 25in x 89in (63.5cm x 226cm) approx. Notes
WOF = width of fabricUse ¼ inch seams, unless instructed otherwiseFabrics used
Quilt top and binding: Two 5in square packs of Blueberry Park by Karen Lewis for Robert Kaufman, plus Robert Kaufman Kona WhiteQuilt back: Quilt Back by Whistler Studios for Windham FabricsIrish Country Living notes: For less experienced quilters, full explanation of techniques mentioned here such as “making a quilt sandwich”, “squaring up” and “binding” can be found in Quick & Easy Quilts, or indeed online.Cutting Out
1 From the white fabric cut eight 5 ½ in x WOF strips. Sub-cut these strips into seven 5 ½in squares each, to yield a total of fifty-six (you need fifty-seven but one more square is cut in the next step).
2 From the white fabric cut three 6in x WOF strips. From two of these strips cut seven 6in squares. From the third strip cut one 6in square and one 5 ½in square. Cut the fifteen 6in squares in half along one diagonal to yield thirty triangles in total.
3 From the white fabric cut six 2 ½ in x WOF strips. Cut one of the 2 ½ in strips into two 21 ½in lengths for the border. Sew the remaining five strips end to end with straight seams and cut into two 89 ½in lengths for the border. Note: you may prefer to wait until the runner is pieced before you cut these border strips.
4 Cut the fusible web into nineteen 5in strips. Sub-cut each of these strips into three 5in squares, to yield fifty-seven in total.
5 Cut the binding fabric into six 2 ½ in x WOF strips.
Creating the Leaves
6 Fuse each 5in square of fusible web on to the back of each coloured 5in square. Remove the paper.
7 Using the zigzag blade (or a regular one) in the rotary cutter, cut one leaf from each square using the dinner plate as a guide (see Figs 1, 2 and 3). Cut one from each of the 57 5in squares.
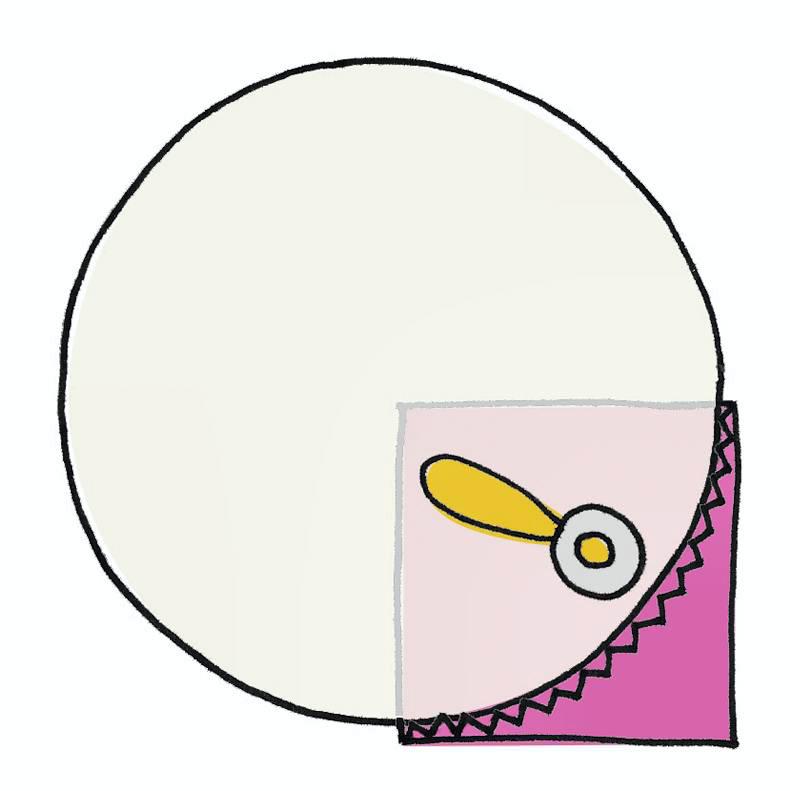
Figure 1

Figure 2
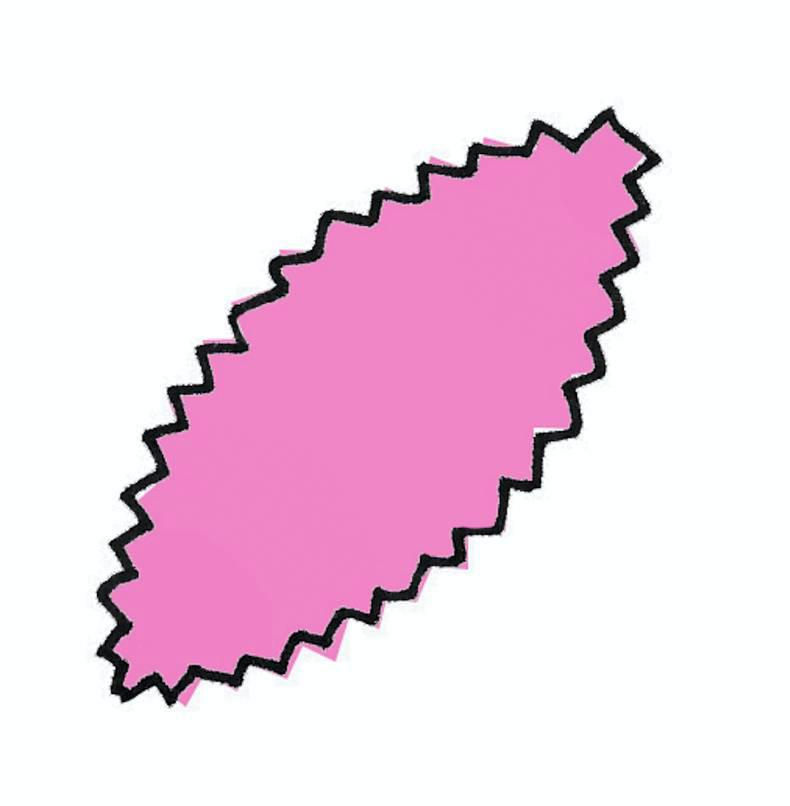
Figure 3
8 Fuse each leaf to one white 5½in square, as shown in Fig 4.
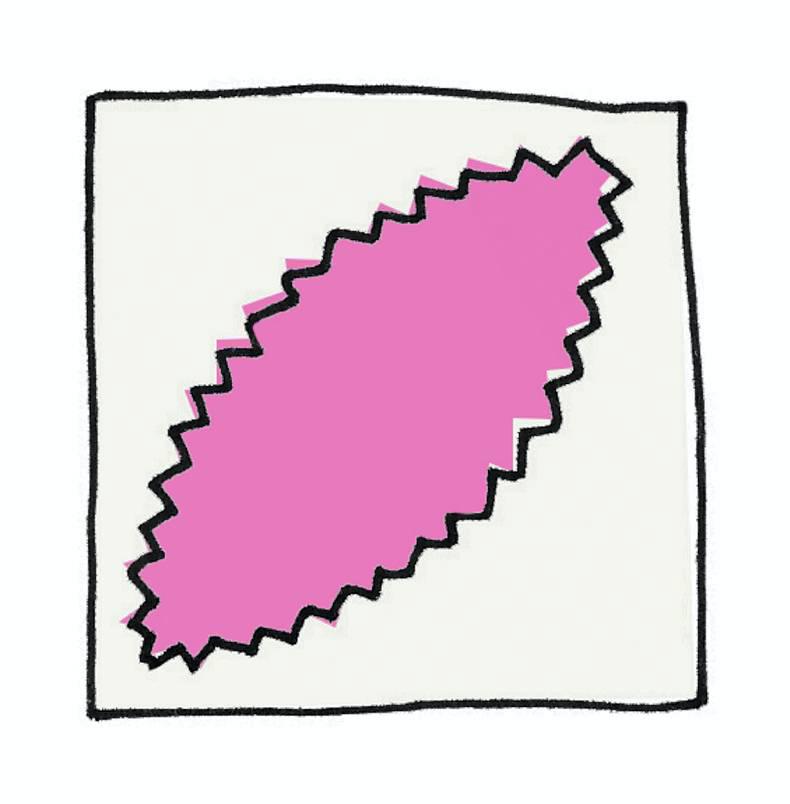
Figure 4
Sew a line of straight stitching approximately 1/8in from the edge of each leaf to secure (Fig 5).
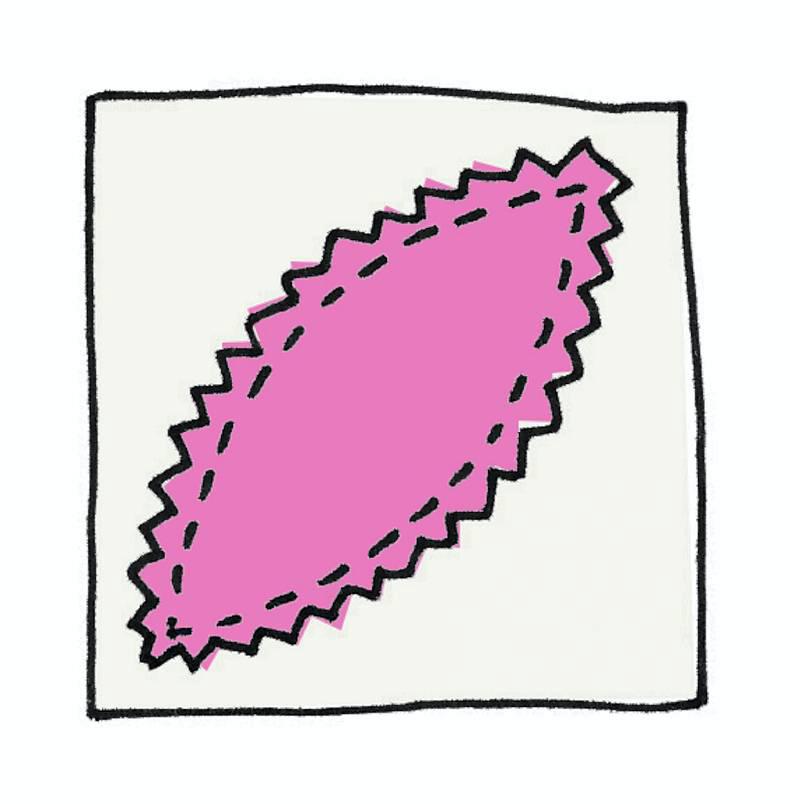
Figure 5
Assembling the Runner
9 Lay out the squares and triangles into 15 rows as follows (see Fig 6):
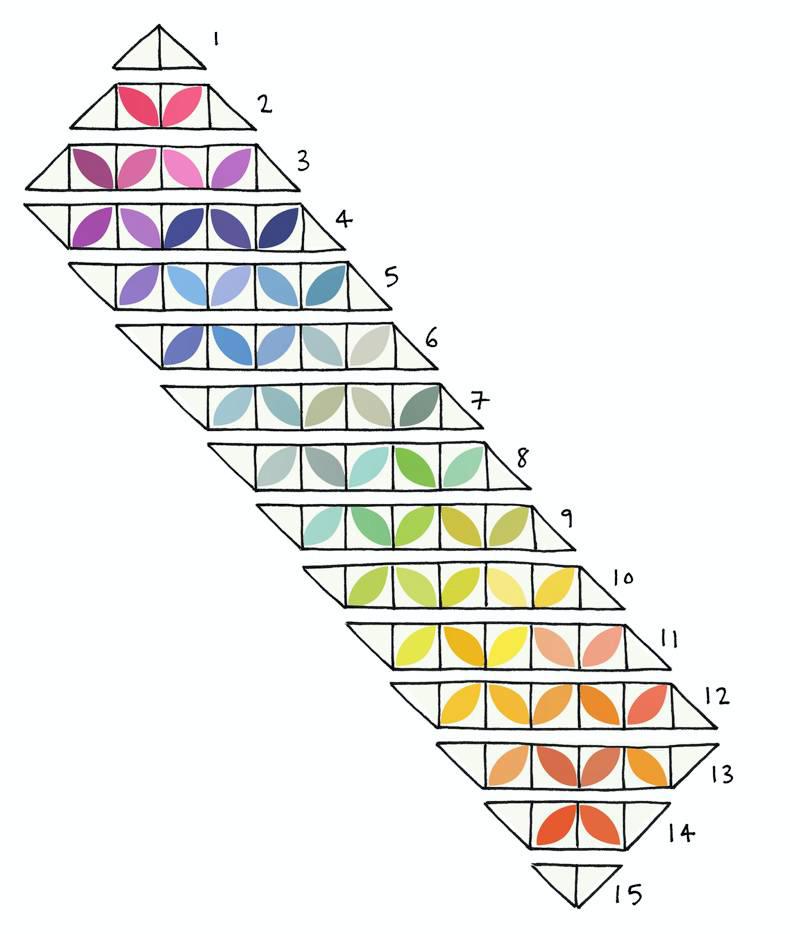
Figure 6
Rows 1 and 15 – two triangles.Rows 2 and 14 – two triangles and two leaves.Rows 3 and 13 – two triangles and four leaves.Rows 4 to 12 – two triangles and five leaves.10 Sew the leaves and triangles into the 15 rows. Press seams in alternate directions in each row.
11 Sew the 15 rows together, taking care to match seams neatly. Press seams open or to one side, as preferred. Trim the sides to a ¼in beyond the corners of the leaf squares.
Adding the Border
12 Measure your runner across the centre width – it should be 21½in, but if not, make a note of the measurement of your runner. Take the white 2½in wide border strips and cut two strips to your measurement (or 21½in). Sew these strips to the shorter sides of the runner, pinning in place at the centre first, and then the sides and then in between, to make sure the strips fit the runner correctly. Press seams away from the centre.
13 Measure your runner across the centre length – it should be 89½in, but if not, make a note of the measurement of your runner. Take the white 2½in wide border strips that you sewed together earlier and cut two strips to your measurement (or 89½in). Sew these strips to the longer sides of the runner, pinning as before. Press seams outwards.
Quilting and Finishing
14 Make a quilt sandwich of the quilt back (right side down), the wadding and the quilt (right side up). (Technique: Making A Quilt Sandwich.)
15 Quilt as desired. The runner shown was quilted with lines ½in apart going across the runner, using a pale thread.
16 When all quilting is finished, square up the runner, removing excess wadding and backing as you do so. (Technique: Squaring Up.)
17 Sew the binding strips together end to end using diagonal seams, or straight seams if preferred. Press wrong sides together all along the length to make a double-fold binding. Bind the runner to finish, taking care to mitre the corners neatly. (Technique: Binding).
Ever fancied making a beautiful homemade quilt, full of your favourite patterns, colours and fabrics, but assumed it would take so long that there was no point starting? Well, in a brand new book, Quick & Easy Quilts, Lynne Goldsworthy shares a stunning collection of projects that you can run up on your sewing machine in record time: some can even be done in a weekend.
And in a four-week series, we will be sharing some of Lynne’s most accessible projects, starting with this rainbow leaves runner.
Rainbow Leaves Runner
This attractive runner is created using fusible web to make the orange peel or leaf shapes. A white background gives a lovely fresh and contemporary look to the design. The shapes are quick and easy to cut using a dinner plate as a guideline and a rotary cutter. This avoids tracing templates and careful scissor cutting, which can take much longer.
Coloured print fabrics for leaves: fifty-seven 5in squares of different fabrics
White fabric: 2 ¼ yds (2m)
Backing fabric: 2 ¾ yds (2.5m)
Wadding: 33in x 97in (85cm x 245cm)
Binding fabric: ½ yd (0.5m)
Fusible web: 2 ¾ yds (2.5m) of 18in (46cm) wide
Dinner plate: approx. 10in (25.5cm) diameter
Zigzag blade for rotary cutter (optional)
Suitable piecing and quilting threads
Finished size: 25in x 89in (63.5cm x 226cm) approx. Notes
WOF = width of fabricUse ¼ inch seams, unless instructed otherwiseFabrics used
Quilt top and binding: Two 5in square packs of Blueberry Park by Karen Lewis for Robert Kaufman, plus Robert Kaufman Kona WhiteQuilt back: Quilt Back by Whistler Studios for Windham FabricsIrish Country Living notes: For less experienced quilters, full explanation of techniques mentioned here such as “making a quilt sandwich”, “squaring up” and “binding” can be found in Quick & Easy Quilts, or indeed online.Cutting Out
1 From the white fabric cut eight 5 ½ in x WOF strips. Sub-cut these strips into seven 5 ½in squares each, to yield a total of fifty-six (you need fifty-seven but one more square is cut in the next step).
2 From the white fabric cut three 6in x WOF strips. From two of these strips cut seven 6in squares. From the third strip cut one 6in square and one 5 ½in square. Cut the fifteen 6in squares in half along one diagonal to yield thirty triangles in total.
3 From the white fabric cut six 2 ½ in x WOF strips. Cut one of the 2 ½ in strips into two 21 ½in lengths for the border. Sew the remaining five strips end to end with straight seams and cut into two 89 ½in lengths for the border. Note: you may prefer to wait until the runner is pieced before you cut these border strips.
4 Cut the fusible web into nineteen 5in strips. Sub-cut each of these strips into three 5in squares, to yield fifty-seven in total.
5 Cut the binding fabric into six 2 ½ in x WOF strips.
Creating the Leaves
6 Fuse each 5in square of fusible web on to the back of each coloured 5in square. Remove the paper.
7 Using the zigzag blade (or a regular one) in the rotary cutter, cut one leaf from each square using the dinner plate as a guide (see Figs 1, 2 and 3). Cut one from each of the 57 5in squares.
Figure 1
Figure 2
Figure 3
8 Fuse each leaf to one white 5½in square, as shown in Fig 4.
Figure 4
Sew a line of straight stitching approximately 1/8in from the edge of each leaf to secure (Fig 5).
Figure 5
Assembling the Runner
9 Lay out the squares and triangles into 15 rows as follows (see Fig 6):
Figure 6
Rows 1 and 15 – two triangles.Rows 2 and 14 – two triangles and two leaves.Rows 3 and 13 – two triangles and four leaves.Rows 4 to 12 – two triangles and five leaves.10 Sew the leaves and triangles into the 15 rows. Press seams in alternate directions in each row.
11 Sew the 15 rows together, taking care to match seams neatly. Press seams open or to one side, as preferred. Trim the sides to a ¼in beyond the corners of the leaf squares.
Adding the Border
12 Measure your runner across the centre width – it should be 21½in, but if not, make a note of the measurement of your runner. Take the white 2½in wide border strips and cut two strips to your measurement (or 21½in). Sew these strips to the shorter sides of the runner, pinning in place at the centre first, and then the sides and then in between, to make sure the strips fit the runner correctly. Press seams away from the centre.
13 Measure your runner across the centre length – it should be 89½in, but if not, make a note of the measurement of your runner. Take the white 2½in wide border strips that you sewed together earlier and cut two strips to your measurement (or 89½in). Sew these strips to the longer sides of the runner, pinning as before. Press seams outwards.
Quilting and Finishing
14 Make a quilt sandwich of the quilt back (right side down), the wadding and the quilt (right side up). (Technique: Making A Quilt Sandwich.)
15 Quilt as desired. The runner shown was quilted with lines ½in apart going across the runner, using a pale thread.
16 When all quilting is finished, square up the runner, removing excess wadding and backing as you do so. (Technique: Squaring Up.)
17 Sew the binding strips together end to end using diagonal seams, or straight seams if preferred. Press wrong sides together all along the length to make a double-fold binding. Bind the runner to finish, taking care to mitre the corners neatly. (Technique: Binding).


SHARING OPTIONS