


Wall hung bookcases
Old wine crates make perfect wall-hung bookcases and shelving units. They look great dotted around or buttressed right up against each other in a stack or a row.
You will need:
Wine crates
Paint – eggshell or emulsion
Roller and small paintbrush
Drill and 3.5mm and 7mm or 7.5mm drill bits
Spirit level
4 x size 8 all-purpose or universal rawl plugs per box
4 x 4cm long screws per box
1. Transforming these just requires a very quick and easy paint job. Either eggshell or matt paints are fine – whichever you have to hand and like best. Two coats should do. As usual, for speed and the best finish, use a roller and in-fill with a brush.
2. Drill four holes in the back of your bookcase – one in each of the corners. Position each hole so that it is 10cm from the edges. Use a 3.5mm drill bit. The holes must be big enough to allow the body of the screw to go through, but not the head.
3. Place a spirit level on the box and hold it up to the wall in the position which you intend to hang your bookcase. When it is level, poke a sharp pencil through the screw holes to mark the drill points on the wall. It’s always a good idea to check for cables or pipework before drilling into a wall – you can buy battery-operated detectors really cheaply.
4. Drill your holes and put the rawl plugs into the wall (I use all-purpose or universal rawl plugs, which are suitable for all types of wall). I always drill holes for rawl plugs using a drill bit smaller than the rawl plug, because it’s easier to make the hole bigger if you need – but if a hole is too big, it’s a total pain because you need to start again. So I’d drill initially with a 7mm drill bit. Try to put the rawl plug in – maybe tap it in with a hammer, if necessary. If it won’t go in, go up to a 7.5mm drill bit. When all four wall holes are ready, place the screws through the holes in the box, guide them into the rawl plugs and screw in place.
Floating bedside box
Functional, stylish and, I think, miles hipper than most bedside tables/cabinets you can buy.
You will need:
Six- or 12-bottle wine box
Paint
1. Just follow the wall-hung bookcases “how to”, but fix them in line with the side of the bed. Now just add books and a mug of tea, curl up in bed and enjoy.
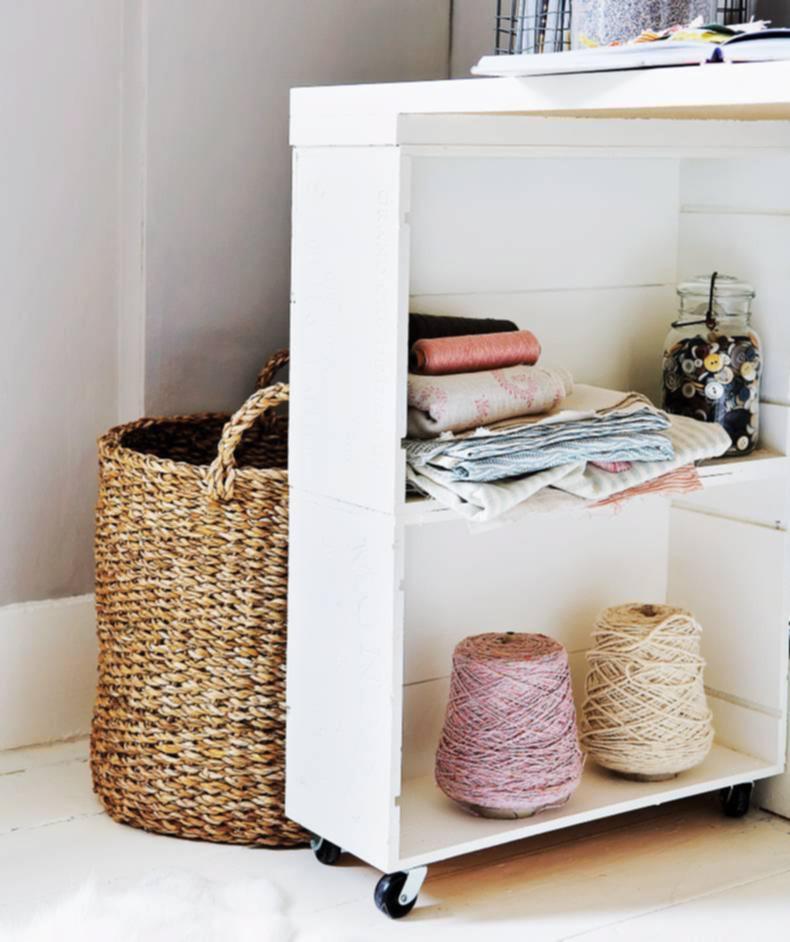
Wine crate desk project
I love this desk. It is such a practical design with its internal storage, big surface area and castors that make it easy to move around. It makes a perfect work space for anything from writing to crafting. The streamlined shelving created by the crates will store books or anything else you want to hand, but they will be tucked away neatly.
I just had to design a wine crate desk after a colleague told me how, when he was a boy, his dad had made one for him. It was a story that stuck. We do so many things for our kids – as our parents did for us – but so much of it is lost in the past and I always wonder what it is that makes one particular thing or moment lodge in the memory while others drift away. So the wine crate desk – a borrowed childhood memory – burned itself into my mind.
I’d imagined the RDD (Robert’s dad’s desk) to be made entirely of wine crates, but I couldn’t make that work. So my version is a combination of wine crates and cheap MDF. It means it’s not entirely free to construct, but it is still way cheaper than buying anything even remotely as stylish.
You will need:
Strong wood glue
4 x 12-bottle wine crates
2 sheets of 30mm MDF measuring 505mm x 175mm and one sheet of MDF measuring 505mm x 1,460mm (or however wide you want it to fit your space)
8 x 50mm castors
32 x 1cm screws for the castors
Drill with 2mm and 4mm drill bit
12 x 6cm screws
Paint – preferably eggshell for the top surface for its durability
Roller and small paintbrush
1. Make the two end supports for the desk. Glue the long sides of two wine crates together to make one support and repeat with the other two for the second support. Make sure the glue gets a good fix by piling some heavy books inside the top crate to press it downwards onto the lower one.
2. Place the large sheet of MDF on the floor. Position one small piece of MDF at either end of the large piece and align the edges. Glue the small pieces in place using plenty of glue. Now position the end supports on top of each of these small sheets of MDF, ensuring the interiors of the crates are facing inwards. Glue these in place. This is the basic construction of the desk upside down.
3. Position four castors on the corners of the base of each end support and screw them on. Using the 2mm drill bit, drill small holes into the wood through the holes in the castor plates for the screws to go into.
4. Now switch to the 4mm drill bit and drill six holes through the top wine crates into the MDF (one at each corner and two in the middle for strength). This is for the 6cm screws, to fix the base to the desk top. Position the screw against the drill bit when you fix the bit into the drill. Make the length of the drill bit slightly shorter than the screw, so that you don’t drill too deeply and go right through the desk top. Screw together.
5. Once the glue that’s fixing the wine crates together is dry, flip the desk over. It is heavy, so get someone to help you if possible.
6. Finally, paint the desk using a roller. I love this desk. Thanks Robert’s dad.
Home Made Simple by Joanna Gosling is published by Kyle Books. Photography by Rachel Whiting. Available online at www.easons.com for €28.99, other stockist prices may vary.
SHARING OPTIONS