

Catherine Carton always has a project on the go. Currently? Spuds.
“I have first earlies in grow bags and that’s my first time to do potatoes,” she smiles, as she talks about her garden in north Dublin, which has become something of a mini urban farm in recent months.
“I’m going to be going around the road with a wheelbarrow full of potatoes, going door to door!”
But maybe it’s not a surprise; during lockdown, Catherine discovered that she actually comes from a long line of agrarians, after a relation began researching their family tree.
“When you look at the birth certs, all of the occupations were herd farmer or crop farmer,” she says. “I wonder is this the ancestral crop farmer coming out in me?!”
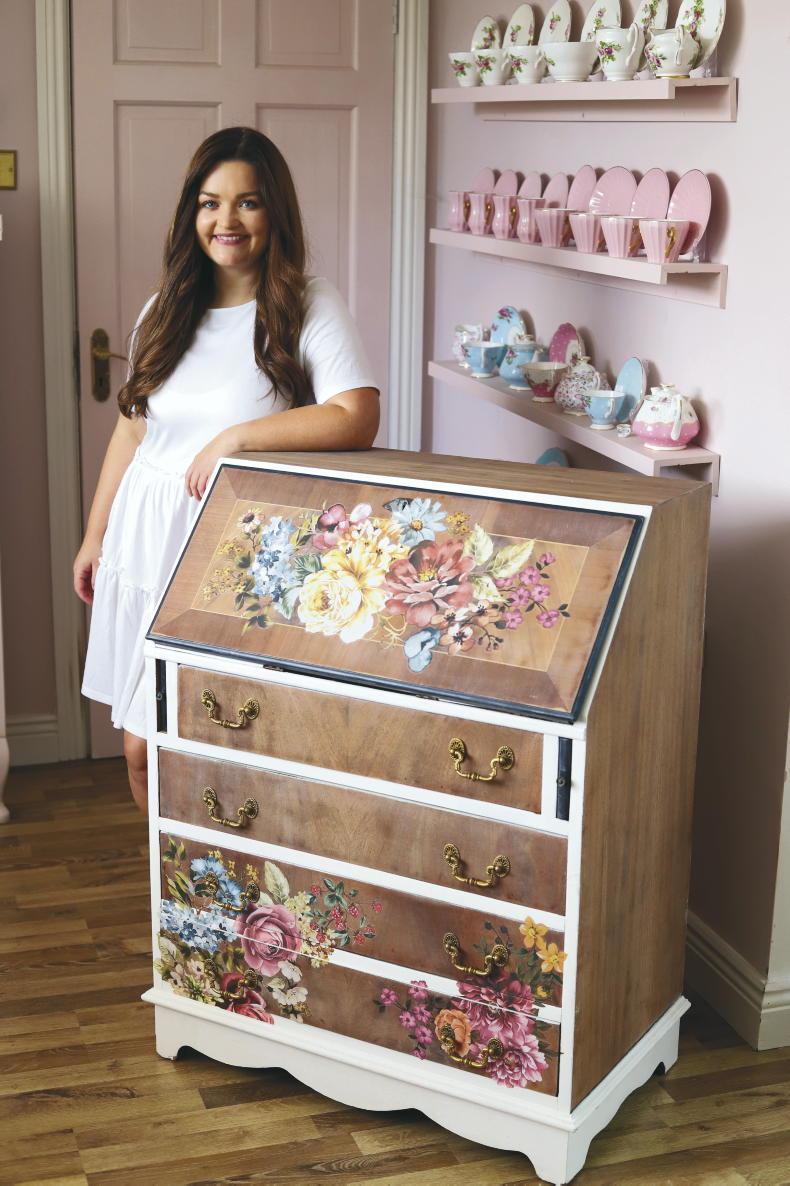
Potatoes aside, however, Catherine also has her hands full promoting her first book: Dainty Dress Diaries – 50 beautiful home-crafting activities to awaken your creativity. And over the coming weeks, Catherine will be sharing some of her projects with Irish Country Living readers, ranging from sewing a memory cushion, scrunchies and reusable make-up pads to upcycling tyres and china cups.
The book is inspired by Catherine’s website, Dainty Dress Diaries, which initially started life as a fashion blog, but pivoted more practically towards DIY in 2014 after she bought her house.
“I had saved, saved, saved, gave the deposit to the bank, paid fees, the solicitor; and I literally had €1,000 and I was like, ‘I need a fridge or a cooker!’” she laughs, recalling how she was left with zero budget for home furnishings.
That started her on a path towards upcycling secondhand pieces that she could afford; for instance, the kitchen table and four chairs that she still uses today cost her just €50, but the set was given a new lease of life after she attended a furniture painting workshop. And it was not long before she signed up for a sewing class to start making her own soft furnishings, followed by a wood-working class to start putting up shelves.
“They’re all intertwined, so a woodwork pattern is so similar to a sewing pattern, only the material and your tools are different,” she says. “When you start learning one, it does apply in other areas.”
Soon, Catherine was sharing her projects on her blog, followed by YouTube videos showing the step-by-step processes. Today, her website gets between 80,000 and 100,000 views a month, with some of her videos racking up to 1.8m views.
However, it was still very much a hobby until Catherine was made redundant from her job as a retail manager during COVID-19. Which is also where the book ties in.
“Two or three weeks later, I got an email from O’Brien Press,” says Catherine of the approach to do her first book, which is dedicated to her late father Patrick (Pat), the “original upcycler” who passed away when she was just 20.
Crammed full of 50 projects, there is something for everybody from the first-time crafter to the more experienced DIY-er, as well as practical advice from sewing terminology to painting tips.
“My favourite would be the tips for painting your wood, your trim, your kitchen, your flatpack furniture,” says Catherine.
“Those projects, people might flick past them in the book, but actually they are very valuable because you can transform your whole house by those couple of pages.”
While the finished projects in the book might look Instagram-perfect, Catherine wants to encourage readers to have a beginner’s mindset when it comes to trying new things. And to embrace the mistakes made along the way – as she believes that perfectionism stifles creativity.
“Don’t compare your beginning to someone else’s end. I think that might be a famous person’s quote I’m stealing, but someone said that and it stuck with me,” she says.
“I think it’s from years of being in school because everything gets graded, you’re afraid of things not being perfect, but actually creativity should be about making mistakes.
Your mistakes are your best teachers, whether your machine is threaded wrong, whether you split your wood when you were drilling it, whether your paint bled; like they are your best lessons, that’s how you actually learn.
“I think it’s just society and social media and our fear of showing people our failures, but there’s no such thing as failure. Not trying is failure.”
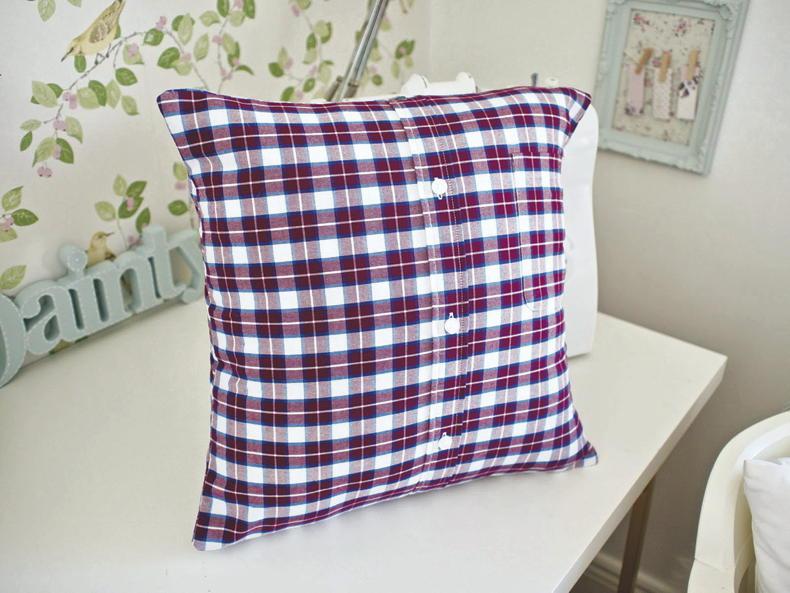
In the first extract from her new book as part of a four-week series Catherine Carton shows us how to make this memory cushion
“I love to make memory cushions and bears for people, taking their loved one’s clothing and stitching it into sentimental keepsakes. When I was 20, I lost my father, so I know all too well the pain of grief and loss, and I know how a piece of clothing can bring back memories and give comfort in times of sorrow.
“With a memory cushion, it feels like a part of that person lives in your home, and unlike a photo, it can be squeezed, hugged and held. I know it’s scary to consider cutting clothes of sentimental value, but here are my tips for transforming them into a memory cushion.
Picking the perfect fabric
Try to find clothes made from cotton and poly-cotton, which don’t stretch too much. Men’s shirts and jeans and women’s dresses and skirts work well and have lots of material in them.
You can also mix different pieces of clothing to create a unique cushion. For beginners, avoid knitwear, silks and material that is stretchy. To build your confidence, practise on old items of your own or clothes from a secondhand shop.
What you need
Method

1 Begin by creating a template. I drew out 17 x 17in (43 x 43cm) square on some paper for the front of the cushion, and a 17 x 14 in (43 x 35.5 cm) piece for the back. These measurements include a 1in seam allowance that will make a 16in cushion.
2 Iron your fabric, then pin on the template and cut one piece of material for the front and two pieces for the back.
3 If you use a shirt, do a line of stitching down the middle to stop the buttons from gaping open when you add your cushion pad.
4 Sew a 1in (2.5cm) hem on to one of the long sides of your back piece. Using your iron, fold over half an inch and press, then fold it over again and press. Secure with some pins and do a straight top-stitch. Do this for both back pieces.
5 You are now going to sew the three pieces together. Place the front piece down with the patterned side of the fabric facing up. Lay a back piece of fabric on top, making sure the two right sides of the material face each other. Line up the sides and corner, and then add the third piece before pinning the fabric together.
6 Allow for a 1in (2.5cm) seam allowance. Sew all around your cushion and use a backstitch to keep your stitches in place.
7 Once your cushion is sewn, you can clip the corners and turn it right side out. Iron it again before inserting a cushion pad.
8 You’re now ready to give this lovely gift, or to keep it for yourself as a memory of someone special.
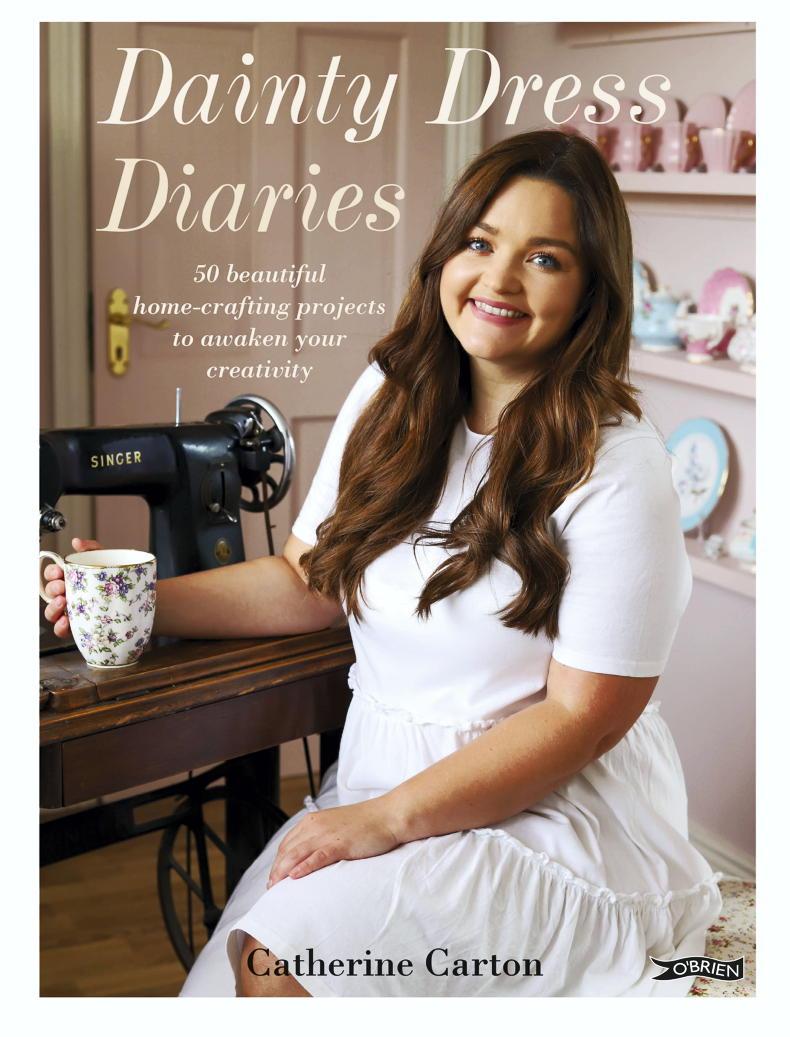
9 Extract from Dainty Dress Diaries - 50 Beautiful Home-Crafting Activities to Awaken Your Creativity by Catherine Carton, published by The O’Brien Press. RRP €19.99.


SHARING OPTIONS