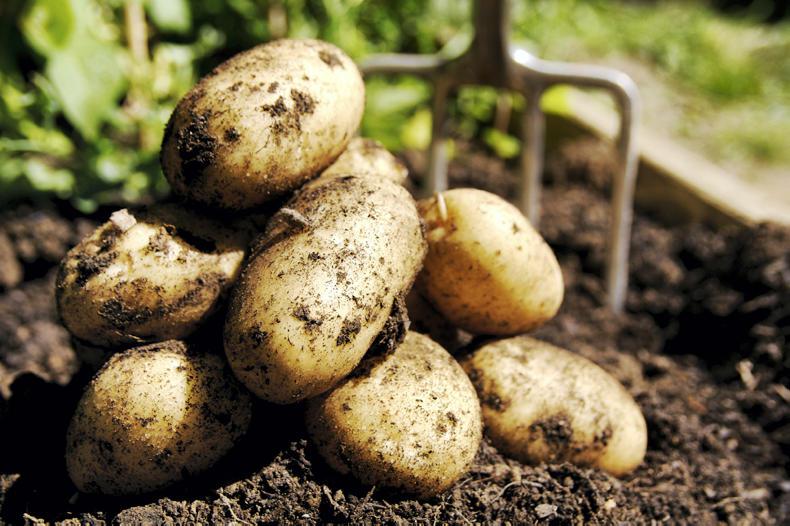
If you don’t have much space, you can still quite successfully grow potatoes in large pots or containers. The pots will need to be relatively deep – about 50cm to 75cm – so the spuds have the depth of soil they need to grow.
Put a layer of compost (10cm) on the bottom of the pot and place the seed potato on it, then cover it with another 10cm layer of compost and water in.
Each time the top of the leaf pops out over the soil cover it over again – you can continue with this until the pot is full.
This plays a little trick on the poor potato plant because it has to grow more stem to get out of the soil – more stem growth means more space for the potatoes to grow. If sowing them at this time of the year, cover them with fleece at night.
In the bag
Alternatively you could try growing spuds in a compost bag. Buy a bag of compost (three bags usually cost about €15), open it carefully (don’t rip the bag), and empty out the compost. Roll the top of the bag down about half way.
Put a small layer of compost back in to the bottom of the bag and put two or three seed potatoes on top (spaced as far apart as you can). Cover them with another layer of compost. Store the remaining compost – you will need it later for earthing up.
Each time you see a shoot appearing above the soil, cover it up with more compost and unroll the bag slightly. Keep adding compost every time a shoot appears until you have used up all the compost and the bag is fully unrolled and full of compost again.
Thirsty work
You will need to water the plants daily, as there is a risk with this type of growing that the compost will dry out – make sure it doesn’t.
When the plants are finished flowering, empty the bag carefully and harvest your lovely spuds.
You can spread the compost in the vegetable garden but don’t re-use it for growing spuds.
You can sow early spuds under cover (for instance, a polytunnel or greenhouse) from now. If leaving the container outside, wait until mid-March to sow. CL
For further information, visit www.GIY.ie
Buying a Polytunnel
A polytunnel extends your growing season at both ends and brings a warmer, drier climate to a corner of your garden. Here are our top tips if you are considering buying one:
• Get as big and tall a polytunnel as you can possibly afford or have space for. You will always want more space for growing and the head-space will be appreciated when digging.• A typical tunnel for home gardeners is 3x6m/10x20ft in size with a height of about 2m/6ft. For suppliers, check out Colm Warren Polytunnels (www.cwp.ie), D-Plant www.dplant.ie) or Polydome (www.polydome.ie).• It should be positioned on well-drained soil and on level ground, in a sunny spot, orientated east-west.• Choose a warm, dry day for erecting the tunnel. This will make the polythene supple and therefore easier to pull tight. Get lots of help – it’s perfect meitheal work. Proper anchoring of the plastic in the soil is vital – otherwise the whole thing could blow away in a gale.• In the summer, there can be extreme heat in the tunnel. Therefore you should build in as much ventilation as possible, by creating wide doors at both ends with ventilation panels.• If well fitted and maintained (washed annually with a soft brush and warm, soapy water), the polythene can last 10 to 15 years.• Watering is essential, especially in summer. Having a tap in the tunnel, or at least close enough for a hose connection, will save a lot of effort.• A bench, shelf or table in a polytunnel provides a great location for propagating seeds and bringing on seedlings.• Read up. I can highly recommend Joyce Russell’s excellent book on the subject, The Polytunnel Book (Frances Lincoln) and Klaus Laitenberger’s Vegetables for the Polytunnel and Greenhouse.
If you don’t have much space, you can still quite successfully grow potatoes in large pots or containers. The pots will need to be relatively deep – about 50cm to 75cm – so the spuds have the depth of soil they need to grow.
Put a layer of compost (10cm) on the bottom of the pot and place the seed potato on it, then cover it with another 10cm layer of compost and water in.
Each time the top of the leaf pops out over the soil cover it over again – you can continue with this until the pot is full.
This plays a little trick on the poor potato plant because it has to grow more stem to get out of the soil – more stem growth means more space for the potatoes to grow. If sowing them at this time of the year, cover them with fleece at night.
In the bag
Alternatively you could try growing spuds in a compost bag. Buy a bag of compost (three bags usually cost about €15), open it carefully (don’t rip the bag), and empty out the compost. Roll the top of the bag down about half way.
Put a small layer of compost back in to the bottom of the bag and put two or three seed potatoes on top (spaced as far apart as you can). Cover them with another layer of compost. Store the remaining compost – you will need it later for earthing up.
Each time you see a shoot appearing above the soil, cover it up with more compost and unroll the bag slightly. Keep adding compost every time a shoot appears until you have used up all the compost and the bag is fully unrolled and full of compost again.
Thirsty work
You will need to water the plants daily, as there is a risk with this type of growing that the compost will dry out – make sure it doesn’t.
When the plants are finished flowering, empty the bag carefully and harvest your lovely spuds.
You can spread the compost in the vegetable garden but don’t re-use it for growing spuds.
You can sow early spuds under cover (for instance, a polytunnel or greenhouse) from now. If leaving the container outside, wait until mid-March to sow. CL
For further information, visit www.GIY.ie
Buying a Polytunnel
A polytunnel extends your growing season at both ends and brings a warmer, drier climate to a corner of your garden. Here are our top tips if you are considering buying one:
• Get as big and tall a polytunnel as you can possibly afford or have space for. You will always want more space for growing and the head-space will be appreciated when digging.• A typical tunnel for home gardeners is 3x6m/10x20ft in size with a height of about 2m/6ft. For suppliers, check out Colm Warren Polytunnels (www.cwp.ie), D-Plant www.dplant.ie) or Polydome (www.polydome.ie).• It should be positioned on well-drained soil and on level ground, in a sunny spot, orientated east-west.• Choose a warm, dry day for erecting the tunnel. This will make the polythene supple and therefore easier to pull tight. Get lots of help – it’s perfect meitheal work. Proper anchoring of the plastic in the soil is vital – otherwise the whole thing could blow away in a gale.• In the summer, there can be extreme heat in the tunnel. Therefore you should build in as much ventilation as possible, by creating wide doors at both ends with ventilation panels.• If well fitted and maintained (washed annually with a soft brush and warm, soapy water), the polythene can last 10 to 15 years.• Watering is essential, especially in summer. Having a tap in the tunnel, or at least close enough for a hose connection, will save a lot of effort.• A bench, shelf or table in a polytunnel provides a great location for propagating seeds and bringing on seedlings.• Read up. I can highly recommend Joyce Russell’s excellent book on the subject, The Polytunnel Book (Frances Lincoln) and Klaus Laitenberger’s Vegetables for the Polytunnel and Greenhouse. 


SHARING OPTIONS