


With the high cost of fertiliser this year, many farmers are spreading product at reduced rates and or taking a “little and often” approach.
It is now more important than ever that the spreader is correctly mounted, in good mechanical order and correctly calibrated for accurate and even application.
The role of the spreader cannot be underestimated, and is particularly important for application at reduced rates, while to an extent, higher application rates can mask poor spreader performance.
1 Inspection
Inspect the frame, hopper and spreading mechanism for any signs of fatigue or wear, such as cracks, corrosion or play that may affect the spreader’s load-carrying ability. Inside the hopper, its shutters should be in good working condition, opening equally and closing fully.
Next, check regulator condition. Worn linkages or other regulator components will affect a spreader’s output and may result in an uneven application.
Depending on the quantity spread on farm, vanes that were borderline on needing to be replaced earlier in the year now need replacing. Good vane condition is critical if a good spread pattern is to be achieved. Vanes that have a rough or wrinkled surface and leading edge that isn’t straight will need to be replaced. What you may think is a small bit of wear here may have a large effect on the machine’s spread pattern. The larger the bout width the larger the inaccuracy becomes.
Bearings should be given a quick check for unwanted movement. On a disc machine, do this by shaking each of the discs vertically. Ideally there should be no bearing wobble, but if present it may be worthwhile investigating further to identify the problem as one or more bearings are beginning to fail.
On a wagtail machine, check the condition of the bearings in the shaker mechanism for play. While most disc machines have sealed gearboxes, the old type wagtail will have a number of grease nipples that need to be greased frequently.
The hopper agitators too should be checked for bearing wobble. Check that any other parts which should move are moving freely. All grease points should get grease before mounting on the tractor.
If fitted with a headland management system, make sure it is engaging and disengaging fully. Depending on the machine this is either done via deflector kit or by changing the direction of the discs via gearbox lever so that discs rotate in the opposite direction.
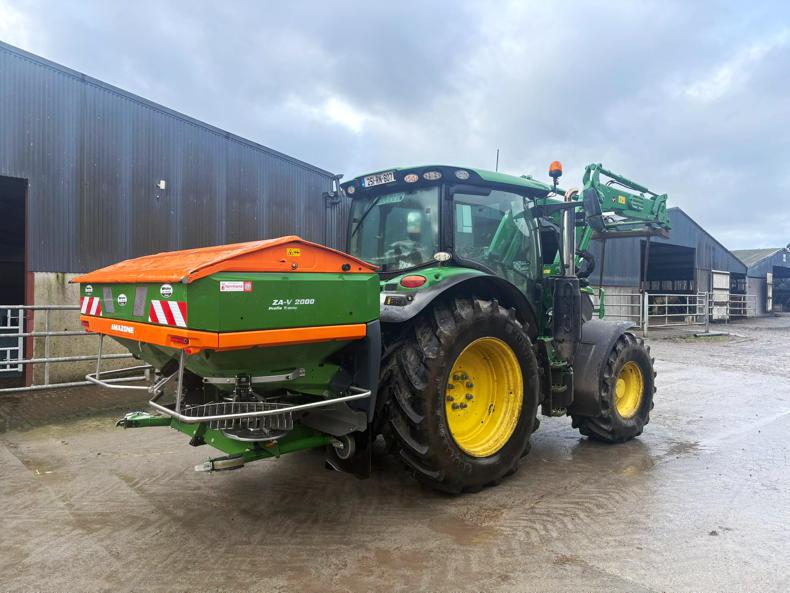
2 Mounting
The drop arms should be measured with a tape and be of equal length before mounting the spreader to the tractor. If the lift arms appear to be screwed out to different positions but still at equal heights, check that rear tyre pressure is equal as a soft tyre will cause one side of the tractor to sit lower. Regardless of the task, each axle’s tyre pressure should always be equal.
Once the spreader is mounted, the stabilisers should be adjusted so that the spreader is securely and centrally positioned with no lateral movement. Not only will unsecured stabilisers cause the spreader to dangerously sway over and back while loaded but will also affect spread pattern.
Raise the spreader to the correct working height. The general rule of thumb is 75cm from the top of the crop to the spreading mechanism (discs or the wagtail). Adjust the toplink so that the spreader is sitting at the angle as advised by the manufacturers spread chart for the particular fertiliser.
3 Disc spreader calibration
A disc machine has two main areas of adjustment – hopper flow rate and disc and vane settings. The steps involved in setting the flow rate on both wagtail and disc machines are similar.
Depending on the spreader, vane type/position, fertiliser drop point (depending on the machine), disc size and toplink angle may all need adjusting in accordance to the spread chart for the selected product at the set working width (m), application rate (kg/ha), forward speed (km/h).
These adjustments vary from brand to brand so you will need to refer to the associated manufacturer’s settings and spread charts.
Most manufacturers have smartphone apps that show spread charts and have calculators that allow you to input the spreading variables above and desired criteria before providing the relevant machine settings to achieve this. The majority of manufacturers have a wide selection of fertiliser types and brands already tested in their test halls and available for selection on their apps.
The spread chart will also indicate the accurate kg/min for each fertiliser to suit each particular machine. To calibrate, shut off one side, and remove the disc on the other side before fitting on the calibration container.
The spreader should be run for one minute while the container gathers the fertiliser. The container’s weight after one minute should match the kg/min rate as displayed by the app or spread chart. For those spreading large quantities of fertiliser and wanting to validate calibration settings and an accurate spread pattern, tray testing for each fertiliser type being applied is advised.
This involves setting up trays at equal distance across the full bout width. Then, make one pass through the middle of the trays with the spreader running. The fertiliser is collected in measuring cylinders and compared according to the manufacturer’s guidelines.
4 Wagtail calibration
A wagtail spreader has only one area of adjustment – the flow rate. Flow rate is adjusted via the regulator, depending on working width (m), application rate (kg/ha), forward speed (km/h) and fertiliser type.
Many manufacturers have smartphone apps that allow you to input all these variables along with the fertiliser or seed type. The app will then provide you with a setting or spread chart.
The one regulator setting will not work for all fertilisers as flow rates vary depending on the fertiliser’s characteristics (shape, size and even the brand). No two samples are the same.
To calibrate a wagtail, remove the spout and fit on a calibration container. Run the spreader at the setting recommend by the app or spread chart and then weigh the fertiliser that came out over the course of a minute. The app or spread chart will provide a rate in kg/min which should match that coming from the spreader. Once this is done and the regulator is set, the wagtail is ready to spread.
5 GPS and spreading
Once the machine has been correctly set up, the onus is now on the operator to drive accurately in the field. Both forward speed and bout width need to be maintained as guided by the spread chart. Once the PTO speed has been set to 540rpm, forward speed can be altered by changing gears.
When using a wagtail-type spreader or small disc machine with a working width in the region of 10-12m, it is reasonably easy to maintain an accurate bout width by eye.
Once working with wider bout widths or spreading on a recently grazed or cut field, it becomes much more difficult to maintain accuracy. Both the lack of visibility in these situations and the desire to remove any potential guesswork has seen many farmers make the move to a manual GPS guidance system this year, especially with the current fertiliser prices, to try and make savings where possible.
It is critically important to ensure the spreader’s bout width and overlap is correctly inputted into the GPS in metres – like any piece of technology, it is only as good as to how it is set up. Incorrect settings here will be the cause of consistent inaccuracy.


SHARING OPTIONS