

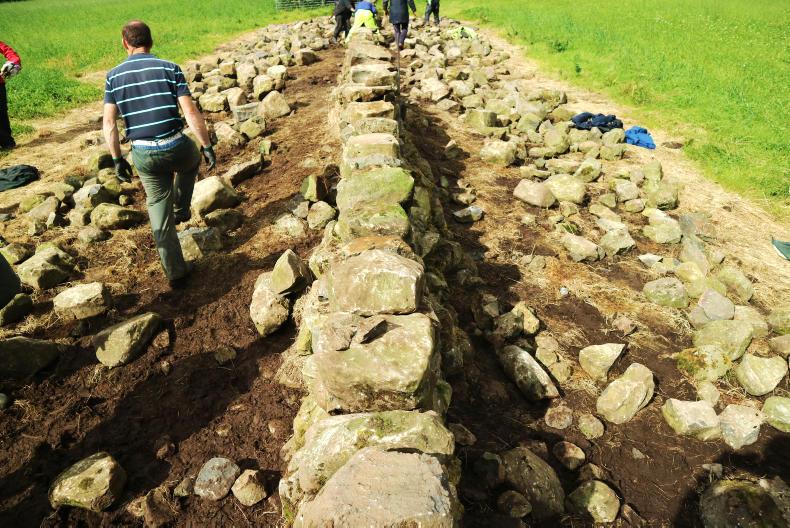
The course, given by Charlie McGeal, was hands-on, with farmers afforded the opportunity to build the wall themselves. Guidance was then given by Charlie throughout the day in a bid to improve the technique of those in attendance. The course is generally run with a small number, which allows Charlie to spend time with each person individually. People on the course work in pairs to build a section of wall together. Single-skinned stone walls are most commonly found in hilly areas, as the large types of stones generally found in these areas are well suited to single-skinned stone walls. There is no fee for partaking in the course
Foundations
When building a new wall, the first thing that should be done is to remove the topsoil. You can then fill in the foundations with smaller stones until you get to ground level. From here on you need to use bigger stones.
It is common to put the flat side of the base stone to the ground as it will sit better, however Charlie recommends that farmers put the flat side facing up as this will provide a much stronger base to construct your wall on. While you might get away with having a sloped stone at the bottom for one or two rows, the higher you build the sharper the slope gets and ultimately the more unstable the wall becomes.
Large stones
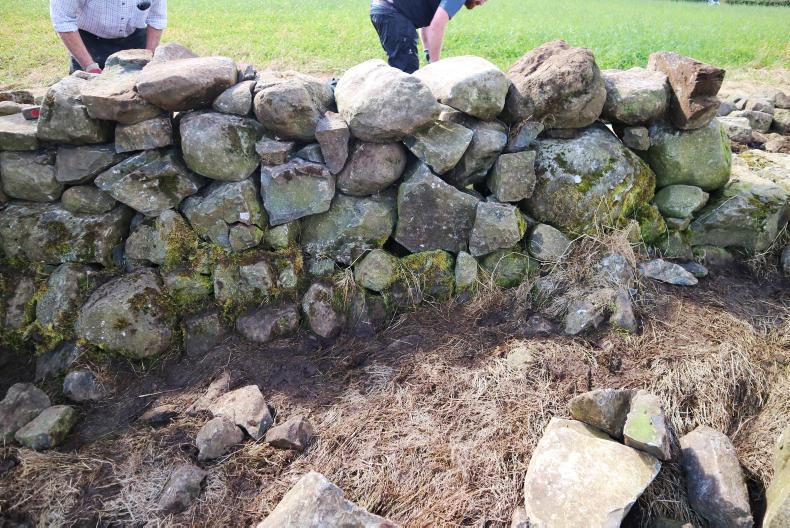
It is important with the single skinned wall to keep all larger and longer stones to the bottom so that there is as much width in the bottom of the wall as possible. While this may seem like obvious advice, Charlie explained that when people find a stone that fits well, even if it is too narrow, the majority of people will just leave it. This will have big structural implications as the wall progresses.
When constructing a single skin wall you should try and visualise an imaginary line up the length of the wall. Then for every stone that is placed on the wall the aim should be to hit the middle of this line.
Charlie mentioned that the majority of people will naturally drift to one side of the wall or the other, and from being at the course it is really evident how people will very easily prioritise one side of the wall over the other. It is also important not to use all the big stones in one area.
People tend to do this early on so that it looks like they have a lot of the wall built quickly, however, doing this will lead to issues as there will be very few large stones left for other sections of the wall.
Try and spread the large stones along the bottom of the wall, increasing the height of the wall the entire way along as opposed to concentrating on smaller individual sections.
Gaps
Where two stones are used to fill a gap in the wall there is no need to fill in the gap in the middle, as shown. Any stone that is placed on top of them will be structurally supported by the two outside stones.
Again, from attending the course, the majority of people will naturally want to fill in this gap, from an aesthetic point of view, however it provides no structural advantage and is just a waste of stone.
The temptation always exists to use the best stone when the wall is initially started, however the ‘ugly’ stones must also be used. If these are not incorporated throughout the entire wall they will end up being concentrated on one part of the wall, which will be unstable.
It will be impossible to get all the big stones to sit perfectly stable on each other without using smaller stones, known as cogs, to fill in the gaps.
It is important to remember that a single skinned stone wall is not like a faced wall for a house, at some points it may not look perfect and there will be gaps but this does not matter as long as it is structurally sound. The use of cogs can be seen in the pictures associated with section five.
For Charlie, it is better if you can pick the stone for the hole as opposed to using too may cogs, but again that takes longer and will deter a lot of people.
It is important to try and tie in the wall as often as possible, however, you do not need to worry if you are unable to do it every time.
The stone will not always be level but what you want to try and get is a straight edge. Even if the straight edge is a diagonal, it means that stones that are built on top of this will fall against each other and will improve the overall structure and strength of the wall.
“Any wall you construct is only as good as the stones you have available. When we are doing this course we try and provide good stone to work with but in many instances people will not have as good of stone available,” Charlie said. “We try and give people a bit of confidence here so that they can then go back and use the stone near them.”
The simplest option can sometimes be the most effective: “oftentimes just turning over a stone will help make it fit into place.”
“One of the biggest mistakes that a farmer can make is rushing, sometimes it looks better if you have a lot of stones up, but it is usually just a matter of turning them over that extra time. A lot of stones will be right for the place but just need levelling off a bit.”
The course is relatively new but the progress has been very positive so far. “This is the first year of the course and the feedback has been very good, we have people who have come back a second time to improve their skills further.”
Avoid back injuries
Farmers should be cautious of health and safety when constructing a dry stone wall. Always wear gloves and steel-toe boots. Protective eye wear is also recommended if you are using a hammer to make some stones fit better by chipping sections off them. The biggest safety concern, by far, is damaging your back. Ensure you use correct technique when lifting and where possible get assistance to lift larger stones. A tractor and front loader or transport box could also be used.


SHARING OPTIONS