March is the month of the vernal equinox, that pivotal point in the year when days decidedly lengthen and spring steadily unfolds. While seasoned vegetable gardeners are most likely set up and ready for action, those starting out will need to prepare their soil before spring kicks in proper.
Thriving vegetable plots start with thoughtful soil preparation and methods can vary from no-dig, single-dig, double-dig to creating raised beds. In Ireland, where soils can range from heavy clay to sandy, the no-dig and raised bed approach to vegetable growing is now particularly popular for a host of reasons.
Although both methods require considerable effort initially, they will significantly reduce ongoing physical labour by providing permanent beds that enhance soil health, biodiversity and the long-term productivity of a plot.
No matter what method you decide on, start small as concentrating your time and resources will make the work more manageable and rewarding.
Starting a no-dig garden
No-dig gardening is certainly the word on everyone’s lips right now and for all the right reasons. It truly is the ultimate soil management method for mimicking natural processes and boosting soil health.
By avoiding soil disturbance, no-dig gardening fosters a thriving ecosystem of beneficial microorganisms, fungi, worms and other macro-organisms.
Another benefit is improved soil structure which promotes better drainage and aeration.
Minimum disturbance accompanied by mulch layers also reduces the amount of weed seeds being exposed to light, hence reducing the weed burden in the months ahead. Win-win!
No-dig does not mean no-work and to create a no-dig garden bed, you will need cardboard (only use brown boxes) for weed suppression, well-rotted compost or manure and organic mulch such as straw or leaf mold.
A broad fork is the ultimate no-dig tool. This two-handled tool is designed to loosen soil and aerate soil deeply without disturbing its structure which in turn promotes better root penetration while maintaining a healthy soil ecosystem.
To start a no-dig bed, begin by choosing an open, sunny location on your site suitable for growing. Ideally keep the bed between 1m and 1.2m for easy access and level the ground if necessary.
Wooden sides can be used as guides but open-sided beds are quicker and cheaper to create whilst removing refuges for slugs and woodlice.
Loosen the ground with a fork or broadfork but do not invert it. Remove any perennial weeds and then cover the ground with overlapping sheets of cardboard, ensuring staples and all remnants of plastic tape are removed.
Raised bed
Next, wet the cardboard thoroughly to encourage decomposition and spread an approximate 10cm layer of compost or well-rotted manure over the cardboard. Follow this with a layer of organic mulch to retain moisture and suppress weeds. It’s good to allow the layers to settle for a few weeks but if time is of the essence, plant sturdy transplants directly into the compost layer.
If you’re converting an existing bed to no-dig, simply broadfork and surface layer with 10cm of organic matter followed by mulch as above.
The raised bed method also offers numerous benefits and is ideal for those with shallow or degraded topsoil, heavy clay soil or in areas with poor drainage. Elevating the soil improves drainage and prevents waterlogging which is common in our wet climate.
Soil quality can also be enhanced as beds can be filled with nutrient-rich, well-draining soil tailored for vegetables.
To boot, raised beds warm up faster in spring enabling earlier cultivation which extends the growing season. Retaining sides can be elevated to desired heights reducing the need for bending, providing accessibility and ergonomic comfort.
To build a raised bed, you will need wooden planks such as scaffolding boards or other recycled materials for the frame, screws and a drill for assembly, brown cardboard for weed suppression and a good quality soil and compost mix. Start by choosing a sunny location.
Construct a rectangular frame using boards or other material, ensuring the bed is spade deep (approximately 30cm) and no wider than 1.2m. Secure the corners with screws and lay cardboard at the base to suppress weeds while allowing drainage.
Fill the bed evenly to the top with a 2:1 mix of high-quality topsoil and well-rotted compost, then level the surface with a rake before sowing seeds or transplanting seedlings and mulch as before.
For anyone looking at a lawn and longing for something richer and more rewarding, no-dig and raised bed gardening offer a perfect, quick solution to building healthy soil and getting up and growing your own food this season.
Q&A: How do I plan new garden paths?
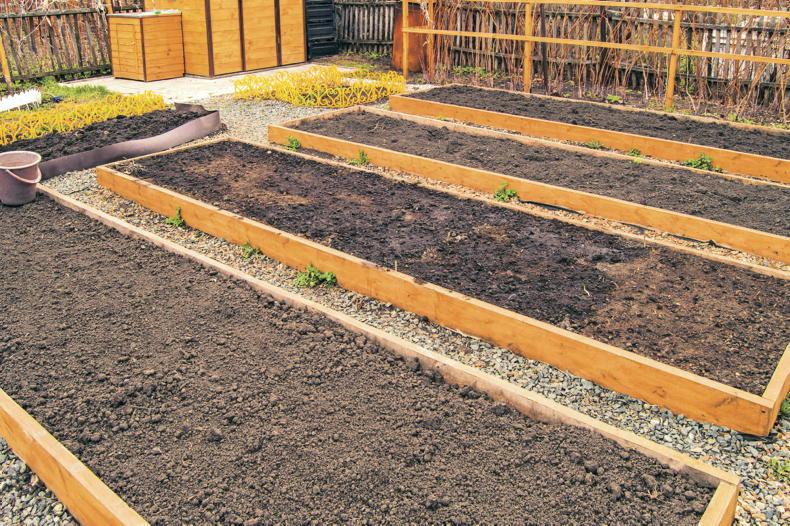
Raised vegetable beds with paths. \iStock
I’m starting a vegetable garden and need to plan paths. How much space should I allocate for them and what materials are best to use? - Mary, Co Laois
Paths are vital for accessing growing spaces, reducing soil compaction, framing beds and enhancing overall garden aesthetics, therefore they warrant careful planning.
Allocate 40–50cm for foot traffic, but consider wider paths for ease of wheelbarrow access if space permits. Grass paths are an option, but ensure they fit your lawnmower’s width and note they may harbour slugs.
Gravel and hoggin paths offer a classy, lower-maintenance solution but can be costly. Woodchip is an affordable, biodegradable alternative that’s easy to source locally. When layered over cardboard, it suppresses weeds and enriches soil biology as it decomposes.
Under cover: If you didn’t sow aubergines, chillis, sweet peppers or tomatoes last month, you can do so in March.
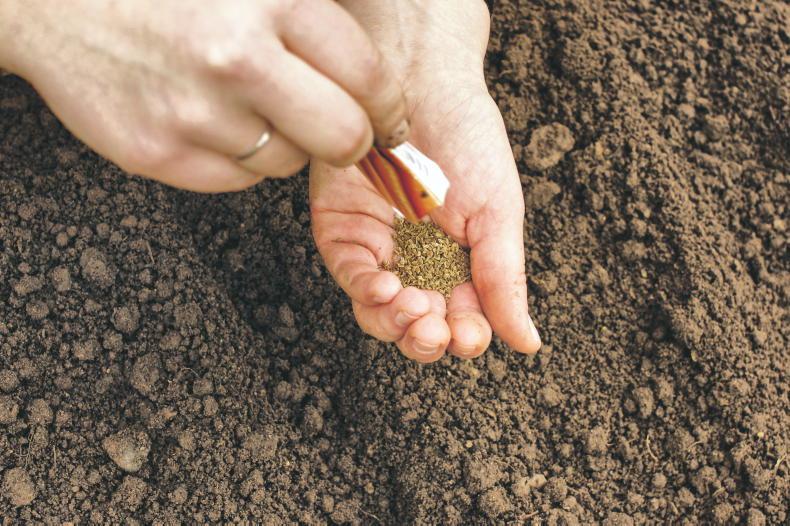
Direct sowing in tunnels: Sow early crops like beetroot, carrots, dwarf peas, oriental salads, and radish directly into tunnel beds. Keep fleece available for protection.
Sow outdoors: Plant potatoes, onion sets and shallot sets. Sow broad beans directly if the soil and weather conditions are suitable.
March is the month of the vernal equinox, that pivotal point in the year when days decidedly lengthen and spring steadily unfolds. While seasoned vegetable gardeners are most likely set up and ready for action, those starting out will need to prepare their soil before spring kicks in proper.
Thriving vegetable plots start with thoughtful soil preparation and methods can vary from no-dig, single-dig, double-dig to creating raised beds. In Ireland, where soils can range from heavy clay to sandy, the no-dig and raised bed approach to vegetable growing is now particularly popular for a host of reasons.
Although both methods require considerable effort initially, they will significantly reduce ongoing physical labour by providing permanent beds that enhance soil health, biodiversity and the long-term productivity of a plot.
No matter what method you decide on, start small as concentrating your time and resources will make the work more manageable and rewarding.
Starting a no-dig garden
No-dig gardening is certainly the word on everyone’s lips right now and for all the right reasons. It truly is the ultimate soil management method for mimicking natural processes and boosting soil health.
By avoiding soil disturbance, no-dig gardening fosters a thriving ecosystem of beneficial microorganisms, fungi, worms and other macro-organisms.
Another benefit is improved soil structure which promotes better drainage and aeration.
Minimum disturbance accompanied by mulch layers also reduces the amount of weed seeds being exposed to light, hence reducing the weed burden in the months ahead. Win-win!
No-dig does not mean no-work and to create a no-dig garden bed, you will need cardboard (only use brown boxes) for weed suppression, well-rotted compost or manure and organic mulch such as straw or leaf mold.
A broad fork is the ultimate no-dig tool. This two-handled tool is designed to loosen soil and aerate soil deeply without disturbing its structure which in turn promotes better root penetration while maintaining a healthy soil ecosystem.
To start a no-dig bed, begin by choosing an open, sunny location on your site suitable for growing. Ideally keep the bed between 1m and 1.2m for easy access and level the ground if necessary.
Wooden sides can be used as guides but open-sided beds are quicker and cheaper to create whilst removing refuges for slugs and woodlice.
Loosen the ground with a fork or broadfork but do not invert it. Remove any perennial weeds and then cover the ground with overlapping sheets of cardboard, ensuring staples and all remnants of plastic tape are removed.
Raised bed
Next, wet the cardboard thoroughly to encourage decomposition and spread an approximate 10cm layer of compost or well-rotted manure over the cardboard. Follow this with a layer of organic mulch to retain moisture and suppress weeds. It’s good to allow the layers to settle for a few weeks but if time is of the essence, plant sturdy transplants directly into the compost layer.
If you’re converting an existing bed to no-dig, simply broadfork and surface layer with 10cm of organic matter followed by mulch as above.
The raised bed method also offers numerous benefits and is ideal for those with shallow or degraded topsoil, heavy clay soil or in areas with poor drainage. Elevating the soil improves drainage and prevents waterlogging which is common in our wet climate.
Soil quality can also be enhanced as beds can be filled with nutrient-rich, well-draining soil tailored for vegetables.
To boot, raised beds warm up faster in spring enabling earlier cultivation which extends the growing season. Retaining sides can be elevated to desired heights reducing the need for bending, providing accessibility and ergonomic comfort.
To build a raised bed, you will need wooden planks such as scaffolding boards or other recycled materials for the frame, screws and a drill for assembly, brown cardboard for weed suppression and a good quality soil and compost mix. Start by choosing a sunny location.
Construct a rectangular frame using boards or other material, ensuring the bed is spade deep (approximately 30cm) and no wider than 1.2m. Secure the corners with screws and lay cardboard at the base to suppress weeds while allowing drainage.
Fill the bed evenly to the top with a 2:1 mix of high-quality topsoil and well-rotted compost, then level the surface with a rake before sowing seeds or transplanting seedlings and mulch as before.
For anyone looking at a lawn and longing for something richer and more rewarding, no-dig and raised bed gardening offer a perfect, quick solution to building healthy soil and getting up and growing your own food this season.
Q&A: How do I plan new garden paths?
Raised vegetable beds with paths. \iStock
I’m starting a vegetable garden and need to plan paths. How much space should I allocate for them and what materials are best to use? - Mary, Co Laois
Paths are vital for accessing growing spaces, reducing soil compaction, framing beds and enhancing overall garden aesthetics, therefore they warrant careful planning.
Allocate 40–50cm for foot traffic, but consider wider paths for ease of wheelbarrow access if space permits. Grass paths are an option, but ensure they fit your lawnmower’s width and note they may harbour slugs.
Gravel and hoggin paths offer a classy, lower-maintenance solution but can be costly. Woodchip is an affordable, biodegradable alternative that’s easy to source locally. When layered over cardboard, it suppresses weeds and enriches soil biology as it decomposes.
Under cover: If you didn’t sow aubergines, chillis, sweet peppers or tomatoes last month, you can do so in March.
Direct sowing in tunnels: Sow early crops like beetroot, carrots, dwarf peas, oriental salads, and radish directly into tunnel beds. Keep fleece available for protection.
Sow outdoors: Plant potatoes, onion sets and shallot sets. Sow broad beans directly if the soil and weather conditions are suitable.


SHARING OPTIONS