The calving jack is an essential aid for every farmer that calves cows.
When used correctly by an experienced operator, the jack can is worth its weight in gold.
But, in the wrong hands, poor use of the jack will damage the cow internally, fracture a calf’s leg and in the worst case, increase calf mortality.
With calving getting under way, outlined are a series of tips on using the jack properly.
1. Know what you are dealing with
Nothing beats experience when calving cows. If you are unsure that a calf can be delivered safely, don’t risk it. Call the vet.
If the calf’s legs are crossed or you can’t get your hand behind the calf’s head and legs, these are signs of a big calf or the cow not opening properly.
Farmers with plenty of calving experience will know at this stage if the calf can be delivered or if the vet will be required.
Making this call early is crucial. If the calf is coming backwards, the best advice is to involve the vet from the outset.
Ignoring these signs, attaching the jack and starting to pull increases the risk of the calf getting stuck at hips and or a cow that won’t get up after calving.
When checking the position of the calf inside the cow and your hand meets resistance or starts to twist as you push forward, the cow has a twisted uterus and the vet will be required.
2. Keep the jack in working order
Check the jack is in working order and wash between each use. The ratchet should work properly across the full length of the bar without any slipping.
3. Choosing calving ropes
Buy a set of thick, soft calving ropes, as they are less inclined to cut into the calf’s leg.
Ropes that are frayed or hard will cause damage to the inside of the cow.
Using a set of red and blue ropes is recommended. Attach the red rope to the right leg and blue to the left leg.
This way, there is less chance of attaching the wrong leg to the wrong side of the jack.
4. Calving hygiene and lubricants
Hygiene is critical when intervening or checking on the calf’s position to determine if the jack will be required.
Dirty hands will transfer bacteria into the cow’s cervix.
Anytime you insert your hand inside the cow, always wear a clean glove and use plenty of lubricant.
Only use proper obstetric lubricants. Do not use products such as washing up liquid, as they are irritants and tend to dry out.
5. When to go for the jack
If the water bag is out and the calf is in the correct position, give the legs a pull by hand.
If they move forward a couple of inches, leave the cow to calve on her own.
Don’t rush to intervene, as the cow may not be fully dilated.
If the cow has made no progress two hours later, attach the leg ropes and pull by hand first.
Once the legs, nose and eyes of the calf are out, this is the point when the jack should be attached.
If the calf’s nose and eyes are not out, it is a sign the calf is stuck at the front shoulders and veterinary intervention will be needed.
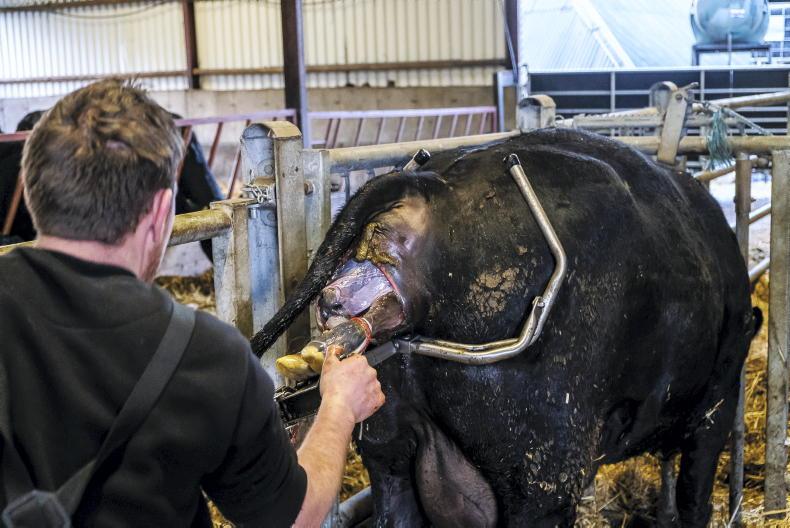
6. Positioning the jack
Once the cow is restrained in the headlock, position the jack so the head frame rests on the cow’s pelvis securely without slipping. Remember to move the cow’s tail out of the way of the jack.
Always stand on the left side of the jack. Never stand between the jack and the side wall.
Only one person should be in control of the jack from this point on.
7. Attaching foot ropes
Attach the red rope to the right foot and blue to the left foot. Make sure the knots are not too close to the foot loop, as they will be more awkward to open and place on the legs.
Place the loop above the calf’s fetlock (wrist joint), with the knot below the leg and facing downwards.
To spread the pressure applied by the jack, double the rope and place a second loop below the fetlock.
Attach the ropes to the jack and use the ratchet to take up the slack.
At the correct tension, the ropes should be taught, but still be pressed together using the thumb and fore finger.
If you attach a head rope, place it behind the calf ears and under the chin.
Never place the rope in the calf’s mouth and never attach a head rope to the calving jack.
8. Smooth use of the jack and work with the cow
Before you starting to jack, reapply plenty of lubricant. It can make a huge difference to the progress of the calf.
Start the jack off level. Use the ratchet in a steady motion to apply pressure.
Once the cow starts to push, stop the ratchet. Work with the cow and lever the bar downwards in a smooth motion.
As the cow relaxes, raise the bar upwards and use the ratchet to take up the slack again.
Don’t jerk or bounce the bar downwards.
Also, don’t over-use the ratchet, as this will stretch the calf out and restrict its ability to breathe.
9. Getting the hips released
If the calf is caught at the hips, this is when experience comes into play, as the cow is likely to go down at this point.
Keep calm and release the pressure on the jack. This will let the calf breathe.
Frantic use of the jack to try to pull the calf will do little to release the calf, but will increase the risk of it dying.
Lever the jack in a sideward motion to try to inch the hips forward and release.
If possible, rotating the calf can help release the hips at this point.
10. Check on the cow and calf after calving
Once the calf is delivered, check the airways are clear and position the animal on clean straw with its legs folded under the body.
In a hard calving, the calf will be sore and slow to stand. Milk the cow and get colostrum into the animal as early as possible.
Don’t forget about the cow. The animal will benefit from some form of pain relief after calving. This will help them get back on their feet and eating.
Read more
Watch: Ten steps to using a calving jack
Top tips and spring calving checklist
The calving jack is an essential aid for every farmer that calves cows.
When used correctly by an experienced operator, the jack can is worth its weight in gold.
But, in the wrong hands, poor use of the jack will damage the cow internally, fracture a calf’s leg and in the worst case, increase calf mortality.
With calving getting under way, outlined are a series of tips on using the jack properly.
1. Know what you are dealing with
Nothing beats experience when calving cows. If you are unsure that a calf can be delivered safely, don’t risk it. Call the vet.
If the calf’s legs are crossed or you can’t get your hand behind the calf’s head and legs, these are signs of a big calf or the cow not opening properly.
Farmers with plenty of calving experience will know at this stage if the calf can be delivered or if the vet will be required.
Making this call early is crucial. If the calf is coming backwards, the best advice is to involve the vet from the outset.
Ignoring these signs, attaching the jack and starting to pull increases the risk of the calf getting stuck at hips and or a cow that won’t get up after calving.
When checking the position of the calf inside the cow and your hand meets resistance or starts to twist as you push forward, the cow has a twisted uterus and the vet will be required.
2. Keep the jack in working order
Check the jack is in working order and wash between each use. The ratchet should work properly across the full length of the bar without any slipping.
3. Choosing calving ropes
Buy a set of thick, soft calving ropes, as they are less inclined to cut into the calf’s leg.
Ropes that are frayed or hard will cause damage to the inside of the cow.
Using a set of red and blue ropes is recommended. Attach the red rope to the right leg and blue to the left leg.
This way, there is less chance of attaching the wrong leg to the wrong side of the jack.
4. Calving hygiene and lubricants
Hygiene is critical when intervening or checking on the calf’s position to determine if the jack will be required.
Dirty hands will transfer bacteria into the cow’s cervix.
Anytime you insert your hand inside the cow, always wear a clean glove and use plenty of lubricant.
Only use proper obstetric lubricants. Do not use products such as washing up liquid, as they are irritants and tend to dry out.
5. When to go for the jack
If the water bag is out and the calf is in the correct position, give the legs a pull by hand.
If they move forward a couple of inches, leave the cow to calve on her own.
Don’t rush to intervene, as the cow may not be fully dilated.
If the cow has made no progress two hours later, attach the leg ropes and pull by hand first.
Once the legs, nose and eyes of the calf are out, this is the point when the jack should be attached.
If the calf’s nose and eyes are not out, it is a sign the calf is stuck at the front shoulders and veterinary intervention will be needed.
6. Positioning the jack
Once the cow is restrained in the headlock, position the jack so the head frame rests on the cow’s pelvis securely without slipping. Remember to move the cow’s tail out of the way of the jack.
Always stand on the left side of the jack. Never stand between the jack and the side wall.
Only one person should be in control of the jack from this point on.
7. Attaching foot ropes
Attach the red rope to the right foot and blue to the left foot. Make sure the knots are not too close to the foot loop, as they will be more awkward to open and place on the legs.
Place the loop above the calf’s fetlock (wrist joint), with the knot below the leg and facing downwards.
To spread the pressure applied by the jack, double the rope and place a second loop below the fetlock.
Attach the ropes to the jack and use the ratchet to take up the slack.
At the correct tension, the ropes should be taught, but still be pressed together using the thumb and fore finger.
If you attach a head rope, place it behind the calf ears and under the chin.
Never place the rope in the calf’s mouth and never attach a head rope to the calving jack.
8. Smooth use of the jack and work with the cow
Before you starting to jack, reapply plenty of lubricant. It can make a huge difference to the progress of the calf.
Start the jack off level. Use the ratchet in a steady motion to apply pressure.
Once the cow starts to push, stop the ratchet. Work with the cow and lever the bar downwards in a smooth motion.
As the cow relaxes, raise the bar upwards and use the ratchet to take up the slack again.
Don’t jerk or bounce the bar downwards.
Also, don’t over-use the ratchet, as this will stretch the calf out and restrict its ability to breathe.
9. Getting the hips released
If the calf is caught at the hips, this is when experience comes into play, as the cow is likely to go down at this point.
Keep calm and release the pressure on the jack. This will let the calf breathe.
Frantic use of the jack to try to pull the calf will do little to release the calf, but will increase the risk of it dying.
Lever the jack in a sideward motion to try to inch the hips forward and release.
If possible, rotating the calf can help release the hips at this point.
10. Check on the cow and calf after calving
Once the calf is delivered, check the airways are clear and position the animal on clean straw with its legs folded under the body.
In a hard calving, the calf will be sore and slow to stand. Milk the cow and get colostrum into the animal as early as possible.
Don’t forget about the cow. The animal will benefit from some form of pain relief after calving. This will help them get back on their feet and eating.
Read more
Watch: Ten steps to using a calving jack
Top tips and spring calving checklist


SHARING OPTIONS