

Over the next four weeks, the livestock team will run a series on calving cows, providing practical advice and top tips.
Week one focuses on management in the run-up to calving and getting the calving shed set up in time.
Once spring calving starts, spare time will be at a premium. Therefore, being as prepared as possible will help take the stress out of calving.
Spring-calving series
1 Cow diet
Around 75% of foetal calf development occurs during the final 10 to 12 weeks of gestation. As the calf grows, so does the cow’s nutritional requirement.
Silage levels should be increased to ad-lib levels around two to three weeks before calving for animals in a body condition score of 2.5 to 3.0.
Where February- and March-calving cows were under-fleshed or over-fat at housing time, body condition should have been corrected by now.
More often than not, restricting silage in the final weeks before calving leads to problems.
Underfed cows lack energy, and can have poorer muscle tone, making animals lethargic and in need of more intervention.
Pre-calving minerals should also be fed and can be offered in various forms.
If silage quality is poor, feeding a protein source such as soya will improve colostrum quality, boosting calf vigour and immunity.
Daily feed rates of 250g to 300g/cow during the final 10 to 14 days of gestation will suffice.
Having cows grouped according to calving date makes this option much more cost effective.
Scour vaccines should also be given now, to allow an immune response to develop.
2 When to move cows to calving pens
If cows are normally moved to straw bedding before calving, do so around 10 to 12 days before the predicted calving date to give animals time to settle again.
A downside of this is the extra cost from increased straw use. Also, there is no guarantee cows will calve 10 or 12 days after being moved.
Some will calve early, some will calve later.
Many farmers prefer to leave cows on slats until they pass the water bag. This is fine if there is someone on hand to check on cows regularly.
If not, there is a risk of calves being born on dirty slats, which is not an ideal start for a newborn.
Also, there is a risk of newborn calves being trampled by other animals, or mis-mothering, especially in the case of replacement heifers.
3 Know the signs of cows in labour
Cows will display different behaviours and body signs as they approach calving.
These differ from cow to cow, so it is important to know your animals to pick up on the signals and changes
As the first stage of labour approaches, the common signs to look out for include:
During the second stage of labour, the cow will pass the water bag and there will be visible contractions as the calf is presented. The final phase of labour is the passing of the placenta post-calving.
A good setup makes it easier to calve cows and deal with problems. Take the time now to prepare the calving shed for the busiest time of year.
1 Clean pens are a must
Calving pens must be hygienic, so wash them now if they are unclean. Pressure washing is advised, ideally with a machine that heats water.
Leave pens to dry before disinfecting all surfaces thoroughly. Spreading hydrated lime is also recommended.
As calves are born without immunity, there is a high risk of disease being transmitted to the newborn calf when it lies with a wet naval face down in bedding.
Clean pens with dry bedding reduces this risk.
When calving is in full swing, cleaning pens between every use is not practical.
However, at the very least, keep the area around the calving gate clean by forking out soiled bedding, then apply lime and fresh straw.
This is where the cow will lie during a difficult calving or veterinary intervention. It is also the area where the calf will hit the ground first.
2 How many calving pens are needed?
For herds calving over a tight 10- to 12-week period, a rule of thumb is one calving pen for every 10 cows in the herd. If calving is condensed over a tight six- to nine-week period, provide one pen for every eight cows. When calving is spread out over a 15-week period, one pen per 15 cows will suffice.
Get these pens set up in advance, rather than waiting for cows to start calving. There are few things more aggravating than a cow calving late at night and not having a free pen available.
Cows should be moved to larger group pens as soon as calves are up on their feet and sucking without any encouragement needed, freeing up pens for other animals.
3 Calving pen
When setting up the calving pen, make sure there is enough room to use the calving jack when the cow is locked in the head gate.
This problem can be overcome in a pen that has gates on all four sides, as the jack can be manoeuvred between rails.
There are plenty of calving pens with walls on three sides, and in smaller pens, trying to use the jack is extremely awkward, so alterations may be needed.
Calving pens should be at least 12ft by 12ft for moderate-sized cows, increasing to at least 13ft by 13ft for larger cows.
4 Safe exit from the calving pen
A calving pen with four gates is safer than one with side walls. Cows in labour will be unpredictable and may become aggressive.
The same goes after calving as the cow protects the calf. Having side gates means there are more escape routes in case of an emergency.
Side walls in the pen cut down escape routes. Always try to restrain the cow before entering the pen.
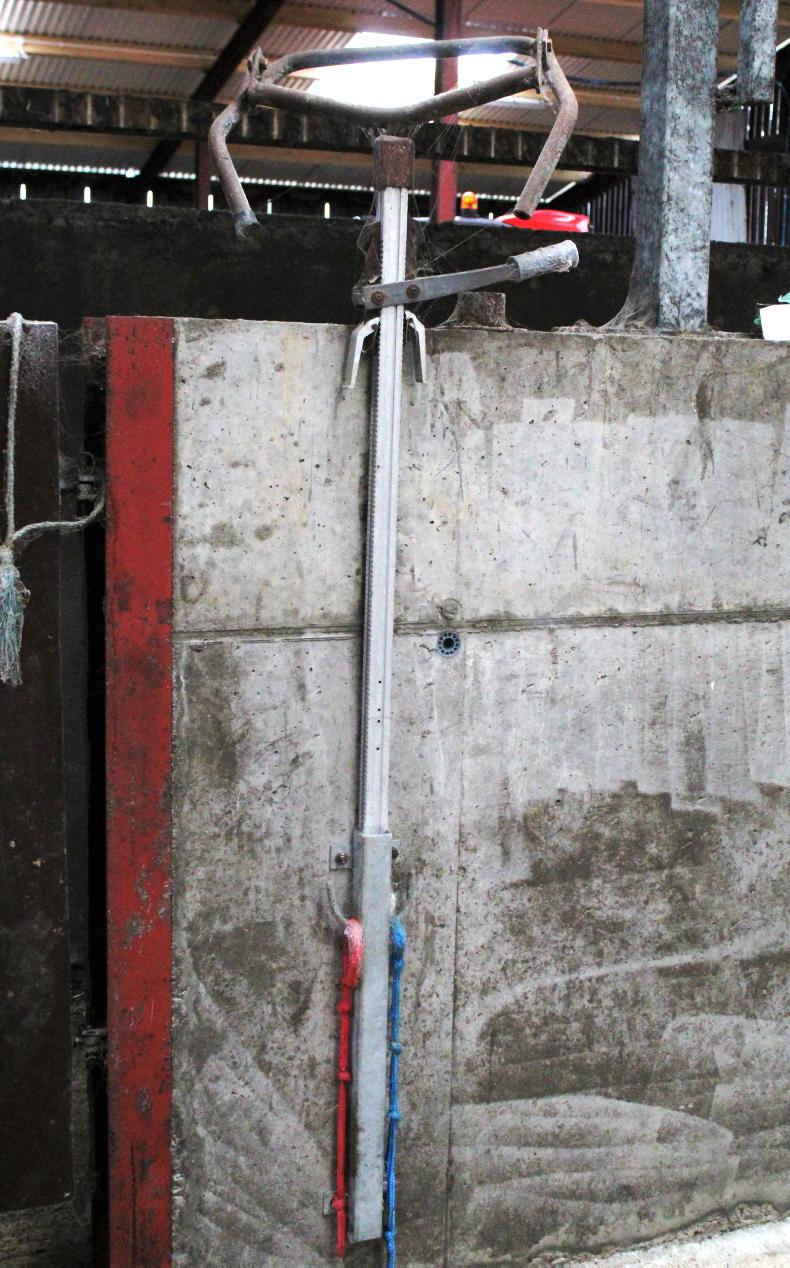
5 Calving gate
A good calving gate is worth the money. It will securely restrain the cow and keep the farmer, or vet, safe when intervening.
The gate should close against the left flank of the cow when the animal is caught in the headlock.
The headlock should have a quick-release latch in case a cow goes down during labour. Cows can choke in a matter of minutes but can be slow to rise, so the quick release is vital.
The gate should be able to open outward as well as inwards, making it easier for a cow to rise again after going down.
he headlock ratchet should have a rope attached, which runs to the end of the gate. This allows the farmer to catch the cow’s head from the rear when directing animals into the headlock.
A good calving gate will have two internal gates. The first one allows access to the side of the cow for caesarean section and the second gate allow calves to suck.
6 Securing the calving gate
Most calving gates are secured to the wall or an internal dividing gate by a chain. More often than not, the chain is badly positioned.
Fixed too high, the chain obstructs the jack. Too low, if the cow goes down suddenly when the farmer or vet has their arm inside, the chain can break an arm.
If the cow goes down, the weight of the animal lying against the gate applies pressure to the chain, making it extremely difficult to release in an emergency.
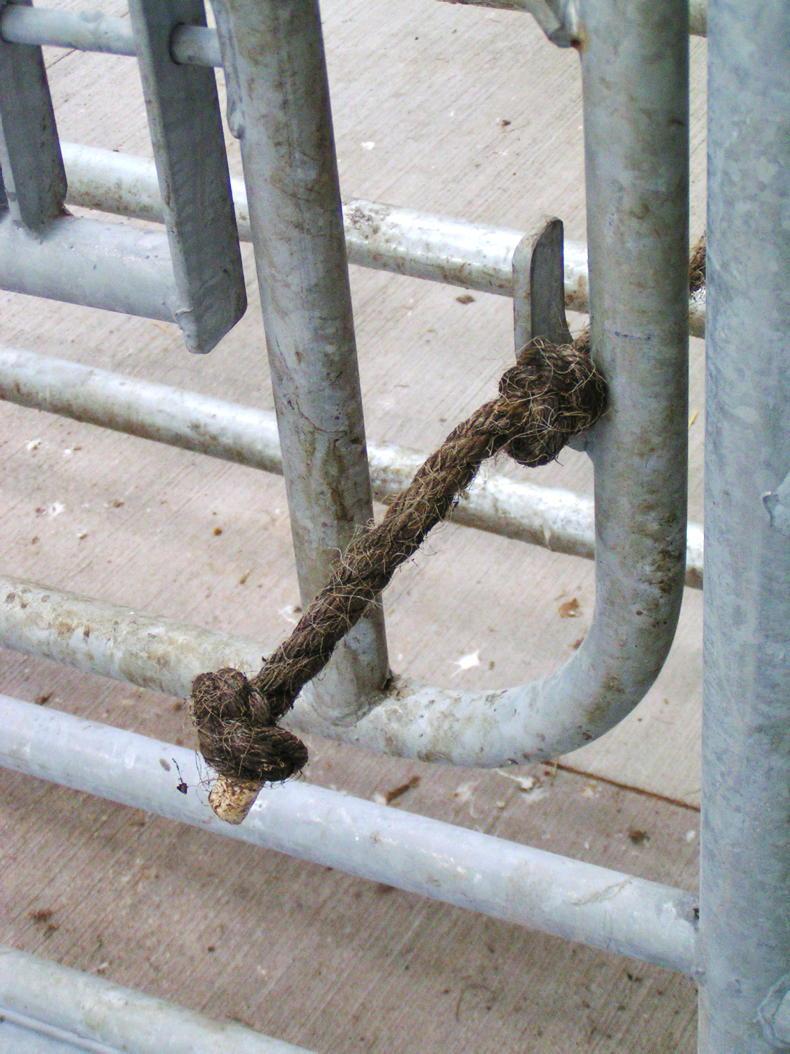
Using a nylon rope to secure the gate means it can be cut in an emergency, releasing the gate. Tying knots in the rope gives it more traction in the chain stays.
7 Work lights
Install good LED lights in the calving pen to increase visibility, especially when calving during the evening or overnight.
8 Clean water
Cows in a calving pen should have ad-lib access to water, as they can lose up to 50l of fluid during labour, leaving them dehydrated.
A bucket of water will not rehydrate cows. Buckets need to be continually filled and cows have a tendency to tip them over, so animals can go a lengthy period before getting another drink.
If calving pens do not have water troughs, then buy a standard garden hose on a reel with a nozzle that can be opened and closed with a trigger.
This is far more practical to go along pens and fill water compared to carrying buckets.
9 Calving aids at the ready
Store calving aids in a location that is handy to the calving pen and always return them to this position after use. This way, anyone calving a cow can locate aids immediately.
Fixing a piece of hollow box iron to the wall will store the jack safely. After washing and disinfecting ropes, attach them to the jack to dry and store.
A good tip for gloves and calving lube is to fix a simple hook bracket to a box, or old plastic container.

Place gloves and lube in the container and hang on the gate when calving a cow. This keeps aids clean, hygienic and within reach when calving on your own.
Other aids such as stomach tubes, calf jackets, heat bulbs, electrolytes, scour remedies, antibiotics and pain relief should also be re-stocked now and stored in the calving shed.
With stomach tubes, do not use if the pipe is damaged.
Also, keep a separate stomach tube that should only be used on sick calves. Mark it with a permanent marker so it can be easily identified.
10 A fully charged mobile phone
Have a mobile phone handy. If you are on your own and need assistance, valuable time can be saved by phoning for help while still working with a cow.
Keep a charger in the calving shed, rather than leaving the phone in the house to charge and being caught for help in the shed.

SHARING OPTIONS