We’re all familiar with festive gingerbread houses but have you ever tried making an entire gingerbread farm? Irish Country Living food journalists Janine Kennedy and Dee Laffan joined forces with Irish Farmers Journal buildings editor Martin Merrick to create a gingerbread farm that any Irish farming family would be proud of.
From the classic two-storey Irish farmhouse to your very own edible slurry and silage pit, this is a project which will come together over a few days and is perfect for kids of all ages.
We had so much fun putting our own little farm together – and as none of us are pastry chefs, this is an amateur attempt which tastes as good as it looks. If we can pull it off, anyone can – so give it a try this Christmas and be sure to send photos of your finished masterpiece to ICL@farmersjournal.ie.
Step One
Make the dough
There are so many different gingerbread recipes out there with varying methods. Some result in a softer biscuit while others are crunchy and hard. You need a good, sturdy gingerbread to make gingerbread buildings, but they don’t necessarily have to be completely crunchy. We tested a few types of gingerbread before settling on a middle-of-the-road biscuit: sturdy and thick, but still slightly chewier than crunchy. The best part? This dough is a cinch to put together; it is basically a one-bowl job. It doesn’t have to chill for too long before being rolled out and cut into shapes.
Easy gingerbread house dough
375g plain flour¼ tsp baking soda2 tsp ground cinnamon2 tsp ground ginger½ tsp allspice½ tsp ground nutmeg¼ tsp salt90g softened butter1 tsp vanilla150g dark brown sugar1 large egg120ml black treacle1 tbsp milk1 In a large bowl, add all of the dry ingredients. Whisk to combine and set aside.
2 Using a stand mixer with the paddle attachment, or an electric hand mixer, cream the butter and brown sugar for 1-2 minutes, until light and fluffy. Add the vanilla and egg. Mix for 2-3 minutes, until well combined.
3 Add the treacle and milk, then add the dry ingredients. Mix carefully at first (the flour will fly everywhere), then build up speed until the dough is stiff and slightly dry.
4 Finish the dough by hand: divide in two and shape each half into discs. Wrap in cling film and chill for 30 minutes (minimum), or overnight.
5 Preheat the oven to 180°C and line a large baking tray with parchment paper. Roll out the chilled dough to approximately 2.5cm thickness. Using the templates and dimensions provided at the end of this article, cut out the shapes for the house and sheds.
6 Place the shapes carefully on the baking tray and bake for 10-12 minutes. Do not under-bake as a softer biscuit will not hold up during construction. We baked these biscuits until they were darkened around the edges (12 minutes), but each oven will differ slightly.
7 Remove from the oven and cool. They can be stored in an airtight container for up to a week.
8 For other batches, you can cut out farm animal shapes using cookie cutters. We sourced our animal cutters online and for the farmers, we used a regular gingerbread man cutter.
9 For the outdoor slats, use the scraps of leftover dough sliced into thin strips and two larger rectangular shapes for the base.
If you plan to make an entire gingerbread farm, you will want to make four batches of this gingerbread dough. One batch will make the gingerbread house.

The farm house is straightforward to assemble and looks impressive once decorated. \ Philip Doyle
Step Two
Let’s get building
There are two effective glues to use when making gingerbread buildings. The most popular is a basic royal icing recipe, the other is a basic caramel.
We found the caramel to be much faster and more effective. However, you have to be extremely careful when working with caramel as it can burn and fuse to the skin very easily. So, if children are involved, you might want to consider using royal icing.
The royal icing will take longer to firm up, making the building process slower. Royal icing doesn’t need to be made from scratch – simply use the store-bought packages found in every supermarket.
Basic caramel
200g caster sugar75ml water1 Using a wide, heavy bottomed pot, add the caster sugar and water. Stir over a medium heat, until melted. Ensure you will be able to dip your longest pieces of gingerbread into the pot.
2 Continue to cook the mixture without stirring for approximately five minutes, until the
mixture turns a deep amber colour. Swirl the pot to mix.
3 Turn the heat down to low to keep warm while you construct the pieces together.
The fairy lights inside the farmhouse provide a fun, warm glow while the wrapped bales are sprayed with shine spray to make them look like real plastic \ Philip Doyle
Step Three
Time to construct
Once your ‘glue’ is ready and your gingerbread pieces have cooled completely, it’s time to build your house and outbuildings.
1 Start with the house. Take the front piece of the house and, using pieces of sheet gelatine, use the
hot caramel as glue and place the sheet gelatine on the back side, covering each window. The gelatine makes the perfect faux windowpanes.
2 Then, dip one short side in the hot caramel. Stick that piece to the corresponding side piece of the house and hold firmly in place until completely fused together.
3 Then, take the back piece of the house and do the same thing, fusing it to the other side piece.
4 Continue to make a complete box.
5 Use a spoon to drizzle hot caramel over the top edges of the house.
6 Place one of the roof pieces onto the front part of the house, then quickly add the other while the caramel is still hot. Drizzle more hot caramel into any cracks as needed.
7 Make the sheds/outbuildings in the same way, though one shed will only have two side pieces and a back piece (for the marshmallow hay bales to sit inside).
8 Allow your buildings to set overnight at room temperature before decorating.
What you need to decorate
Cookie cuttersSheets of gelatine3-4 packages of
royal icing mix Food colouring (black, green, red, blue) Skittles, M&Ms, or
sugar-coated gumdropsBlack candy meltsBlack and white
fondant icing Desiccated coconut
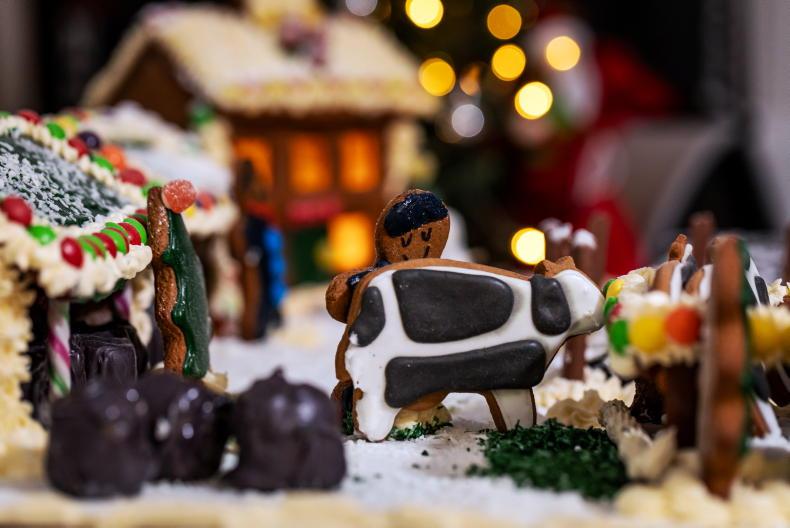
One of our farmers is wearing his blue overalls while he feeds the cows (with a red Farmers Journal bucket, of course) \ Philip Doyle
Step Four
Time to decorate
Before you decorate, place some fairy lights in the house which you can switch on afterwards to make it look like someone is home.
To decorate the farm house and buildings, we used two types of icing. Royal icing works well for finer decorations and for flooding (for example, the green roofs of the sheds). Sculpting buttercream (see recipe) was used for piped decorations. It’s easy to pipe and it holds its shape perfectly.
For decorations, we used skittles, M&Ms, and sugar-coated gumdrops. We also used candy canes as posts in one of the sheds.
We placed the farm on four large cake boards covered in white fondant. We filled any cracks with desiccated coconut once all the buildings were placed and decorated. We also dyed some desiccated coconut green to look like silage for the cows.
First, pipe icing wherever you like and then decorate with the candies of your choice.
Sculpting buttercream
100g Flora 115g softened butter500g icing sugar1 tsp vanilla30ml milkPinch of sea salt1 Using a stand mixer with the paddle attachment, or an electric hand mixer, beat the Flora and butter together until pale, light and creamy.
2 Add the icing sugar, vanilla, salt and milk. Beat on high until light, fluffy and creamy.
3 This can be made 1-2 days in advance. Keep in an airtight container and chill. Bring to room temperature before placing in a piping bag to decorate. For added effect, divide the buttercream and dye each portion with a different food colouring.
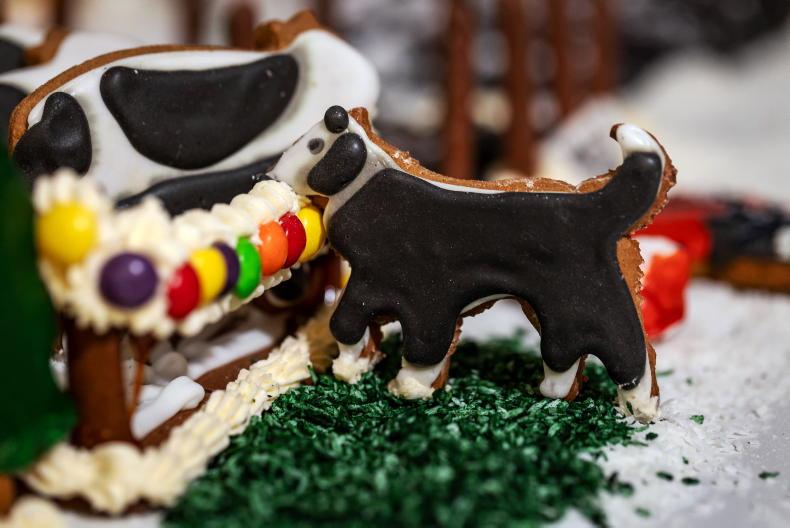
We decorated our Border Collie and Freisian cows with black and white royal icings using a method called flooding. The green silage is desicated coconut which we dyed with food colouring \ Philip Doyle
Decorating your farm animals and farmers
1 We used a method called flooding for decorating our individual biscuits. To do this, use royal icing dyed different colours (like black and white for the cows and border collie). You want to make the royal icing a bit thick so it can be piped around the edges of the biscuits.
2 Then, get another piece of royal icing. Make this one thinner by adding a drop of water. This is for flooding the biscuit – the piped borders will hold the looser icing in.
3 Once the base icing is dry, you can use the thicker royal icing to design the next layer (for example, black patches on the cows, buttons on the farmer’s overalls).
4 Leave the biscuits to dry overnight before placing them on the farm. You can create whatever figures represent your farm. We had trees, cows, a dog, two farmers and a tractor.
Step Five
Make your extras
We also included a slurry pit, a silage pit and some wrapped bales on our gingerbread farm.
Slurry pit
For the chocolate ganache:
200ml cream200g dark chocolate, roughly choppedFor the dirt:
200g Oreo cookies 60g butterTo construct:
Chocolate fingersSculpting buttercream1 small square of white fondant1 edible pen in black1 To make the ganache, place the chocolate in a bowl. Bring the cream to boil and immediately, pour over the chocolate. Stir until the chocolate is melted and the ganache is smooth and thick. This can be made a few days in advance. When ready to use, microwave for a few seconds so it can be easily poured into the slurry pit.
2 To make the Oreo ‘dirt’, place the biscuits in a food processor and pulse until they are fine crumbs. Melt the butter and add it to the Oreos. Pulse again to combine. The mixture should be crumbly.

The slurry put is made from Oreo crumbs and a thick chocolate ganache \ Philip Doyle
3 To make the slurry pit, create the edges with the Oreo “dirt” – pile it around in a rectangular shape, thereby creating a space where you can pour the chocolate ganache. Pipe the sculpting buttercream around the edges of the “dirt” to create more of a border. Pour the chocolate ganache into the centre of the pit and spread it around slightly to cover the entire area.
4 Stick chocolate fingers into the sculpting buttercream to make it look like a fence.
5 Lets not forget farm safety. On the square of white fondant, write “Danger, slurry” and place the warning sign on the front of the pit.
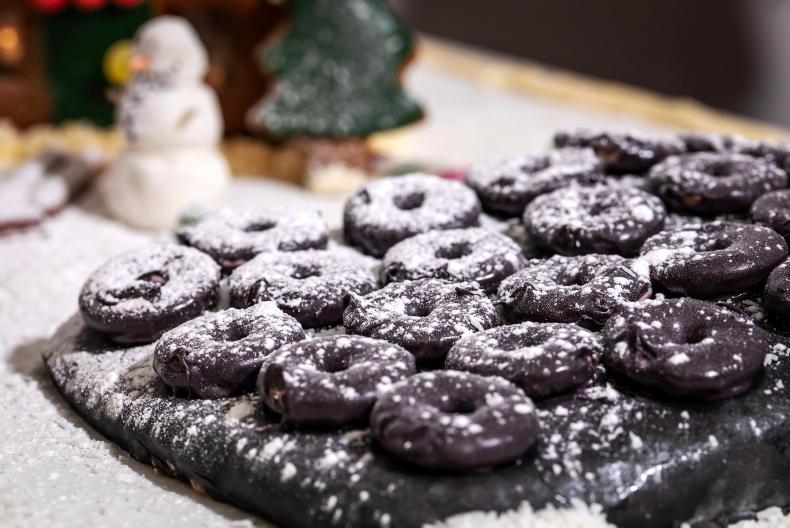
The silage pit is made from Rice Krispie treats and covered in black fondant. The tyres are Party Ring biscuits covered in black candy melts \ Philip Doyle
Silage pit
150g butter1 tsp vanilla500g marshmallows250g Rice Krispies200g black fondant, rolled thinly20-30 Party Rings biscuits200g black candy meltsEdible shine spray
(for cake decorating, optional)
1 In a heavy bottomed pot, melt the butter and add the marshmallows and vanilla. When everything is melted together, add the Rice Krispies and mix well to combine.
2 Lightly grease a rectangular casserole dish and shape the Rice Krispies treats into a silage pit (sloping; one higher side and then gradually getting lower). Leave to chill overnight.
3 When ready, place the thinly rolled black fondant over the top and smooth it firmly all over the silage pit. This is the plastic sheeting.
4 Trim the edges of the fondant and place the pit on the gingerbread farm. Melt the black candy melts and dip each Party Ring biscuit into it. These are your tyres. Place each one on top of the silage pit.
5 Spray the silage pit with the edible shine spray to make it look like plastic.
Wrapped bales
10-15 large marshmallowsBlack candy melts, meltedEdible shine spray1 Dip each marshmallow in the black candy coating and set aside to dry.
2 Once dry, spray with the edible shine spray to make the coating look like plastic. Place the bales around the farm wherever you like.

Gingerbread farm dimensions for the front of the house.

Gingerbread farm: side of house.

Gingerbread farm: roof of house.

Gingerbread farm: front/back of shed.

Gingerbread farm: side of shed.

Gingerbread farm: roof of shed.
Read more
Nessa Robin's edible gifts for the festive season
Causeway Coastal Christmas
We’re all familiar with festive gingerbread houses but have you ever tried making an entire gingerbread farm? Irish Country Living food journalists Janine Kennedy and Dee Laffan joined forces with Irish Farmers Journal buildings editor Martin Merrick to create a gingerbread farm that any Irish farming family would be proud of.
From the classic two-storey Irish farmhouse to your very own edible slurry and silage pit, this is a project which will come together over a few days and is perfect for kids of all ages.
We had so much fun putting our own little farm together – and as none of us are pastry chefs, this is an amateur attempt which tastes as good as it looks. If we can pull it off, anyone can – so give it a try this Christmas and be sure to send photos of your finished masterpiece to ICL@farmersjournal.ie.
Step One
Make the dough
There are so many different gingerbread recipes out there with varying methods. Some result in a softer biscuit while others are crunchy and hard. You need a good, sturdy gingerbread to make gingerbread buildings, but they don’t necessarily have to be completely crunchy. We tested a few types of gingerbread before settling on a middle-of-the-road biscuit: sturdy and thick, but still slightly chewier than crunchy. The best part? This dough is a cinch to put together; it is basically a one-bowl job. It doesn’t have to chill for too long before being rolled out and cut into shapes.
Easy gingerbread house dough
375g plain flour¼ tsp baking soda2 tsp ground cinnamon2 tsp ground ginger½ tsp allspice½ tsp ground nutmeg¼ tsp salt90g softened butter1 tsp vanilla150g dark brown sugar1 large egg120ml black treacle1 tbsp milk1 In a large bowl, add all of the dry ingredients. Whisk to combine and set aside.
2 Using a stand mixer with the paddle attachment, or an electric hand mixer, cream the butter and brown sugar for 1-2 minutes, until light and fluffy. Add the vanilla and egg. Mix for 2-3 minutes, until well combined.
3 Add the treacle and milk, then add the dry ingredients. Mix carefully at first (the flour will fly everywhere), then build up speed until the dough is stiff and slightly dry.
4 Finish the dough by hand: divide in two and shape each half into discs. Wrap in cling film and chill for 30 minutes (minimum), or overnight.
5 Preheat the oven to 180°C and line a large baking tray with parchment paper. Roll out the chilled dough to approximately 2.5cm thickness. Using the templates and dimensions provided at the end of this article, cut out the shapes for the house and sheds.
6 Place the shapes carefully on the baking tray and bake for 10-12 minutes. Do not under-bake as a softer biscuit will not hold up during construction. We baked these biscuits until they were darkened around the edges (12 minutes), but each oven will differ slightly.
7 Remove from the oven and cool. They can be stored in an airtight container for up to a week.
8 For other batches, you can cut out farm animal shapes using cookie cutters. We sourced our animal cutters online and for the farmers, we used a regular gingerbread man cutter.
9 For the outdoor slats, use the scraps of leftover dough sliced into thin strips and two larger rectangular shapes for the base.
If you plan to make an entire gingerbread farm, you will want to make four batches of this gingerbread dough. One batch will make the gingerbread house.
The farm house is straightforward to assemble and looks impressive once decorated. \ Philip Doyle
Step Two
Let’s get building
There are two effective glues to use when making gingerbread buildings. The most popular is a basic royal icing recipe, the other is a basic caramel.
We found the caramel to be much faster and more effective. However, you have to be extremely careful when working with caramel as it can burn and fuse to the skin very easily. So, if children are involved, you might want to consider using royal icing.
The royal icing will take longer to firm up, making the building process slower. Royal icing doesn’t need to be made from scratch – simply use the store-bought packages found in every supermarket.
Basic caramel
200g caster sugar75ml water1 Using a wide, heavy bottomed pot, add the caster sugar and water. Stir over a medium heat, until melted. Ensure you will be able to dip your longest pieces of gingerbread into the pot.
2 Continue to cook the mixture without stirring for approximately five minutes, until the
mixture turns a deep amber colour. Swirl the pot to mix.
3 Turn the heat down to low to keep warm while you construct the pieces together.
The fairy lights inside the farmhouse provide a fun, warm glow while the wrapped bales are sprayed with shine spray to make them look like real plastic \ Philip Doyle
Step Three
Time to construct
Once your ‘glue’ is ready and your gingerbread pieces have cooled completely, it’s time to build your house and outbuildings.
1 Start with the house. Take the front piece of the house and, using pieces of sheet gelatine, use the
hot caramel as glue and place the sheet gelatine on the back side, covering each window. The gelatine makes the perfect faux windowpanes.
2 Then, dip one short side in the hot caramel. Stick that piece to the corresponding side piece of the house and hold firmly in place until completely fused together.
3 Then, take the back piece of the house and do the same thing, fusing it to the other side piece.
4 Continue to make a complete box.
5 Use a spoon to drizzle hot caramel over the top edges of the house.
6 Place one of the roof pieces onto the front part of the house, then quickly add the other while the caramel is still hot. Drizzle more hot caramel into any cracks as needed.
7 Make the sheds/outbuildings in the same way, though one shed will only have two side pieces and a back piece (for the marshmallow hay bales to sit inside).
8 Allow your buildings to set overnight at room temperature before decorating.
What you need to decorate
Cookie cuttersSheets of gelatine3-4 packages of
royal icing mix Food colouring (black, green, red, blue) Skittles, M&Ms, or
sugar-coated gumdropsBlack candy meltsBlack and white
fondant icing Desiccated coconut
One of our farmers is wearing his blue overalls while he feeds the cows (with a red Farmers Journal bucket, of course) \ Philip Doyle
Step Four
Time to decorate
Before you decorate, place some fairy lights in the house which you can switch on afterwards to make it look like someone is home.
To decorate the farm house and buildings, we used two types of icing. Royal icing works well for finer decorations and for flooding (for example, the green roofs of the sheds). Sculpting buttercream (see recipe) was used for piped decorations. It’s easy to pipe and it holds its shape perfectly.
For decorations, we used skittles, M&Ms, and sugar-coated gumdrops. We also used candy canes as posts in one of the sheds.
We placed the farm on four large cake boards covered in white fondant. We filled any cracks with desiccated coconut once all the buildings were placed and decorated. We also dyed some desiccated coconut green to look like silage for the cows.
First, pipe icing wherever you like and then decorate with the candies of your choice.
Sculpting buttercream
100g Flora 115g softened butter500g icing sugar1 tsp vanilla30ml milkPinch of sea salt1 Using a stand mixer with the paddle attachment, or an electric hand mixer, beat the Flora and butter together until pale, light and creamy.
2 Add the icing sugar, vanilla, salt and milk. Beat on high until light, fluffy and creamy.
3 This can be made 1-2 days in advance. Keep in an airtight container and chill. Bring to room temperature before placing in a piping bag to decorate. For added effect, divide the buttercream and dye each portion with a different food colouring.
We decorated our Border Collie and Freisian cows with black and white royal icings using a method called flooding. The green silage is desicated coconut which we dyed with food colouring \ Philip Doyle
Decorating your farm animals and farmers
1 We used a method called flooding for decorating our individual biscuits. To do this, use royal icing dyed different colours (like black and white for the cows and border collie). You want to make the royal icing a bit thick so it can be piped around the edges of the biscuits.
2 Then, get another piece of royal icing. Make this one thinner by adding a drop of water. This is for flooding the biscuit – the piped borders will hold the looser icing in.
3 Once the base icing is dry, you can use the thicker royal icing to design the next layer (for example, black patches on the cows, buttons on the farmer’s overalls).
4 Leave the biscuits to dry overnight before placing them on the farm. You can create whatever figures represent your farm. We had trees, cows, a dog, two farmers and a tractor.
Step Five
Make your extras
We also included a slurry pit, a silage pit and some wrapped bales on our gingerbread farm.
Slurry pit
For the chocolate ganache:
200ml cream200g dark chocolate, roughly choppedFor the dirt:
200g Oreo cookies 60g butterTo construct:
Chocolate fingersSculpting buttercream1 small square of white fondant1 edible pen in black1 To make the ganache, place the chocolate in a bowl. Bring the cream to boil and immediately, pour over the chocolate. Stir until the chocolate is melted and the ganache is smooth and thick. This can be made a few days in advance. When ready to use, microwave for a few seconds so it can be easily poured into the slurry pit.
2 To make the Oreo ‘dirt’, place the biscuits in a food processor and pulse until they are fine crumbs. Melt the butter and add it to the Oreos. Pulse again to combine. The mixture should be crumbly.
The slurry put is made from Oreo crumbs and a thick chocolate ganache \ Philip Doyle
3 To make the slurry pit, create the edges with the Oreo “dirt” – pile it around in a rectangular shape, thereby creating a space where you can pour the chocolate ganache. Pipe the sculpting buttercream around the edges of the “dirt” to create more of a border. Pour the chocolate ganache into the centre of the pit and spread it around slightly to cover the entire area.
4 Stick chocolate fingers into the sculpting buttercream to make it look like a fence.
5 Lets not forget farm safety. On the square of white fondant, write “Danger, slurry” and place the warning sign on the front of the pit.
The silage pit is made from Rice Krispie treats and covered in black fondant. The tyres are Party Ring biscuits covered in black candy melts \ Philip Doyle
Silage pit
150g butter1 tsp vanilla500g marshmallows250g Rice Krispies200g black fondant, rolled thinly20-30 Party Rings biscuits200g black candy meltsEdible shine spray
(for cake decorating, optional)
1 In a heavy bottomed pot, melt the butter and add the marshmallows and vanilla. When everything is melted together, add the Rice Krispies and mix well to combine.
2 Lightly grease a rectangular casserole dish and shape the Rice Krispies treats into a silage pit (sloping; one higher side and then gradually getting lower). Leave to chill overnight.
3 When ready, place the thinly rolled black fondant over the top and smooth it firmly all over the silage pit. This is the plastic sheeting.
4 Trim the edges of the fondant and place the pit on the gingerbread farm. Melt the black candy melts and dip each Party Ring biscuit into it. These are your tyres. Place each one on top of the silage pit.
5 Spray the silage pit with the edible shine spray to make it look like plastic.
Wrapped bales
10-15 large marshmallowsBlack candy melts, meltedEdible shine spray1 Dip each marshmallow in the black candy coating and set aside to dry.
2 Once dry, spray with the edible shine spray to make the coating look like plastic. Place the bales around the farm wherever you like.
Gingerbread farm dimensions for the front of the house.
Gingerbread farm: side of house.
Gingerbread farm: roof of house.
Gingerbread farm: front/back of shed.
Gingerbread farm: side of shed.
Gingerbread farm: roof of shed.
Read more
Nessa Robin's edible gifts for the festive season
Causeway Coastal Christmas


SHARING OPTIONS