For many suckler farmers, spring calving kicks off in February. For others, it may be in March or April.
Either way, a high level of herd management during the calving period will reduce problems that arise and deliver more live calves on the ground.
Over the next three weeks, the livestock team will run a series of management articles linked to herd management at calving time.
This week, the focus is on preparation for calving and managing the cow during labour. Next week focuses on problems at calving with the final feature on post-calving care.
1 Get the pre-calving diet right
Cows calving in February and March should now be in the optimum body condition. There is little merit in trying to restrict silage to slim down cows at this stage.
If anything, it will cause problems as underfed cows are taking in less energy. Rapid weight loss in late pregnancy can lead to metabolic issues, particularly in cows with a strong dairy influence.
Therefore, cows should be offered ad-lib silage around two to three weeks prior to predicted calving date and offered pre-calving minerals.
Cows calving during the day are more likely to get intervention at the right stage.
Feeding cows in the evening can help to reduce the number of animals calving late at night or the early hours of the morning.
Offer fresh silage every evening to cows from two to three weeks before their predicted calving date.
Only offer enough silage to last until morning. For this method to work, cows should be in a fasted state for a few hours before the next allocation of fresh silage.
When silage is offered again, cows tend to eat their fill, then lie and ruminate. This can delay the onset of labour for a few hours, pushing more cows to calve in the morning.
3 When to move cows to the calving pen
Some farmers prefer moving cows to straw-bedded pens before they calve down. This is fine provided they are moved early enough to settle into their new environment in good time.
This option will also require adequate housing space and use more straw, which comes at a cost.
Many farmers prefer to leave the cow alone until she has passed the water bag, then move to a calving pen or straw-bedded loose house.
Again, this is fine, but you need to be on hand for every labour to move cows in time.
If a cow is missed and calves on slats, there is a risk of the calf being trampled by other cows, mis-mothered or picking up an infection from dung on slats.
Calving pens should be cleaned and disinfected before they are needed.
Check calving gates are in working order and can open forward to release a cow that goes down while restrained in the head lock.
Make sure there is enough room to use the calving jack once the cow is locked in the head gate.
Calving pens should be at least 12ft by 12ft for moderate-sized cows, increasing to at least 13ft by 13ft for larger cows.
Think about safety as a freshly calved cow can be extremely aggressive. Always make sure you have an escape point from a calving pen after assisting the cow.
When in use, most calving gates are secured to the wall or side gate by a chain. But if a cow goes down, it is extremely difficult to release the chain under pressure from the downed animal.
Therefore, secure the chain with a rope that can be quickly cut in an emergency.
5 Keep calving aids in a handy location
Store items like ropes, gloves and lubricant in a bucket or plastic container that can be hung on the side of a calving gate with a simple hook.
This way, when you are working at the cow, all aids that may be required are within easy reach.
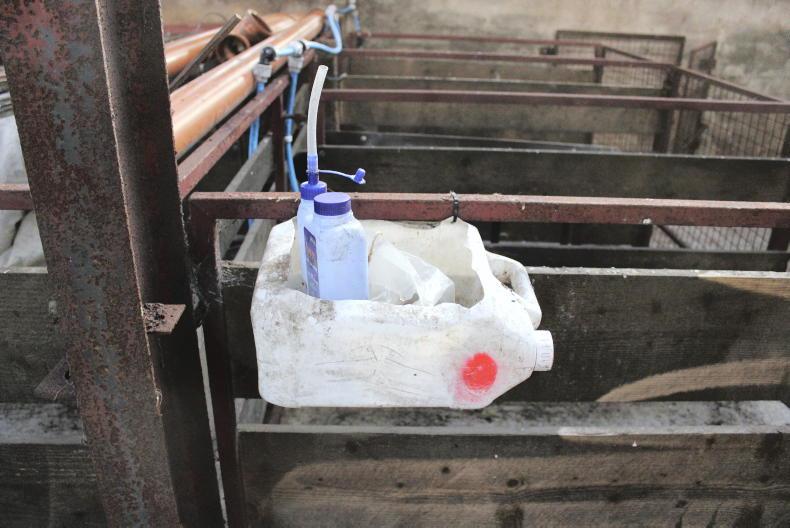
Hanging a container with aids such as gloves and lubricant on the calving gate means they are within reach when needed.
6 When to intervene at calving
Hopefully most cows will calve on their own. But when there is no progress, you have to step in. Timing the intervention differs.
With heifers, intervention will be needed earlier than with mature cows. Cows carrying twins also need early intervention.
Cows calving to a new stock bull may benefit from early intervention as a confidence builder.
Generally, if the cow has the tail up, water bag out and is visibly pressing but no progress has been made, then step in. For heifers, step in after one hour. Increase to two hours for mature cows.
On your first visit to the calving shed in the morning, and a cow is in labour, step in and check things out immediately, as you can’t be sure how long the animal has been labouring.
7 Check calf presentation
When intervening, you need to know what feels normal. Check the front legs and head are correctly positioned. If not, try to correct the position, if possible.
Legs coming backwards should be a cause of alarm, as should the calf’s tongue being swollen and the fluids in the water bag being a reddish-brown colour.
If you can’t feel a calf and your arm is rotating inside the cow, the animal most likely has a twisted uterus and the vet will be required immediately.
8 Making a call on big calves
When checking the presentation of the calf, if the front legs are starting to cross over, this is a sign of a big calf or broad shoulders.
Make the call early if you think veterinary intervention is needed. This is better than pulling a big calf that gets stuck and dies.
9 Double-loop the calving ropes
Use a set of red and blue ropes to pull the calf. Attach the red rope to right leg and blue rope to the left leg. Double looping the ropes on the calf’s leg is recommended as this spreads the pressure when pulling by hand or the jack. Place the first loop above the fetlock and second loop below the fetlock.
If you can’t pull the calf by hand using ropes, then get the jack.
In the wrong hands, the jack increases the risk of an injured or dead calf.
Position the head frame on the cow’s pelvis, keeping the cow’s tail out of the way.
Always stand to the left of the jack. Apply plenty of lubricant and use the ratchet in a steady motion to apply pressure.
When the cow pushes, stop the ratchet.
Lever the bar downwards in a smooth motion. As the cow relaxes, raise the bar upwards and use the ratchet to take up the slack.
If the calf gets stuck at the hips, release the pressure from the jack to let the calf breathe. Re-apply lubricant and try to work one of the calf’s hips out by levering jack to one side.
Read more
Beef Management: slurry spreading delay, compensatory group and new webinars
Thrive: yearlings hitting weight targets this winter
For many suckler farmers, spring calving kicks off in February. For others, it may be in March or April.
Either way, a high level of herd management during the calving period will reduce problems that arise and deliver more live calves on the ground.
Over the next three weeks, the livestock team will run a series of management articles linked to herd management at calving time.
This week, the focus is on preparation for calving and managing the cow during labour. Next week focuses on problems at calving with the final feature on post-calving care.
1 Get the pre-calving diet right
Cows calving in February and March should now be in the optimum body condition. There is little merit in trying to restrict silage to slim down cows at this stage.
If anything, it will cause problems as underfed cows are taking in less energy. Rapid weight loss in late pregnancy can lead to metabolic issues, particularly in cows with a strong dairy influence.
Therefore, cows should be offered ad-lib silage around two to three weeks prior to predicted calving date and offered pre-calving minerals.
Cows calving during the day are more likely to get intervention at the right stage.
Feeding cows in the evening can help to reduce the number of animals calving late at night or the early hours of the morning.
Offer fresh silage every evening to cows from two to three weeks before their predicted calving date.
Only offer enough silage to last until morning. For this method to work, cows should be in a fasted state for a few hours before the next allocation of fresh silage.
When silage is offered again, cows tend to eat their fill, then lie and ruminate. This can delay the onset of labour for a few hours, pushing more cows to calve in the morning.
3 When to move cows to the calving pen
Some farmers prefer moving cows to straw-bedded pens before they calve down. This is fine provided they are moved early enough to settle into their new environment in good time.
This option will also require adequate housing space and use more straw, which comes at a cost.
Many farmers prefer to leave the cow alone until she has passed the water bag, then move to a calving pen or straw-bedded loose house.
Again, this is fine, but you need to be on hand for every labour to move cows in time.
If a cow is missed and calves on slats, there is a risk of the calf being trampled by other cows, mis-mothered or picking up an infection from dung on slats.
Calving pens should be cleaned and disinfected before they are needed.
Check calving gates are in working order and can open forward to release a cow that goes down while restrained in the head lock.
Make sure there is enough room to use the calving jack once the cow is locked in the head gate.
Calving pens should be at least 12ft by 12ft for moderate-sized cows, increasing to at least 13ft by 13ft for larger cows.
Think about safety as a freshly calved cow can be extremely aggressive. Always make sure you have an escape point from a calving pen after assisting the cow.
When in use, most calving gates are secured to the wall or side gate by a chain. But if a cow goes down, it is extremely difficult to release the chain under pressure from the downed animal.
Therefore, secure the chain with a rope that can be quickly cut in an emergency.
5 Keep calving aids in a handy location
Store items like ropes, gloves and lubricant in a bucket or plastic container that can be hung on the side of a calving gate with a simple hook.
This way, when you are working at the cow, all aids that may be required are within easy reach.
Hanging a container with aids such as gloves and lubricant on the calving gate means they are within reach when needed.
6 When to intervene at calving
Hopefully most cows will calve on their own. But when there is no progress, you have to step in. Timing the intervention differs.
With heifers, intervention will be needed earlier than with mature cows. Cows carrying twins also need early intervention.
Cows calving to a new stock bull may benefit from early intervention as a confidence builder.
Generally, if the cow has the tail up, water bag out and is visibly pressing but no progress has been made, then step in. For heifers, step in after one hour. Increase to two hours for mature cows.
On your first visit to the calving shed in the morning, and a cow is in labour, step in and check things out immediately, as you can’t be sure how long the animal has been labouring.
7 Check calf presentation
When intervening, you need to know what feels normal. Check the front legs and head are correctly positioned. If not, try to correct the position, if possible.
Legs coming backwards should be a cause of alarm, as should the calf’s tongue being swollen and the fluids in the water bag being a reddish-brown colour.
If you can’t feel a calf and your arm is rotating inside the cow, the animal most likely has a twisted uterus and the vet will be required immediately.
8 Making a call on big calves
When checking the presentation of the calf, if the front legs are starting to cross over, this is a sign of a big calf or broad shoulders.
Make the call early if you think veterinary intervention is needed. This is better than pulling a big calf that gets stuck and dies.
9 Double-loop the calving ropes
Use a set of red and blue ropes to pull the calf. Attach the red rope to right leg and blue rope to the left leg. Double looping the ropes on the calf’s leg is recommended as this spreads the pressure when pulling by hand or the jack. Place the first loop above the fetlock and second loop below the fetlock.
If you can’t pull the calf by hand using ropes, then get the jack.
In the wrong hands, the jack increases the risk of an injured or dead calf.
Position the head frame on the cow’s pelvis, keeping the cow’s tail out of the way.
Always stand to the left of the jack. Apply plenty of lubricant and use the ratchet in a steady motion to apply pressure.
When the cow pushes, stop the ratchet.
Lever the bar downwards in a smooth motion. As the cow relaxes, raise the bar upwards and use the ratchet to take up the slack.
If the calf gets stuck at the hips, release the pressure from the jack to let the calf breathe. Re-apply lubricant and try to work one of the calf’s hips out by levering jack to one side.
Read more
Beef Management: slurry spreading delay, compensatory group and new webinars
Thrive: yearlings hitting weight targets this winter


SHARING OPTIONS