This year, given the hike in fertiliser costs, many farmers are considering liquid fertiliser, especially on headlands due to precise nutrient placement right up to the field’s border. For many, liquid fertiliser also proves a cheaper option in comparison to granular fertiliser this spring.
As result, older sprayers have or are soon to be called upon, many of which may not be suitable for the task.
With that in mind, we caught up with Gavin Weldon of Wel-Tech, based in Ardee, Co Louth, to get some tips on general sprayer maintenance and some points to consider before setting your sprayer up for liquid fertiliser spraying. Aside from being main dealers for Landquip sprayers and Topcon Systems, Wel-Tech specialises in sprayer testing and service.
When it comes to sprayer maintenance, the basic principles remain the same regardless if it’s a simple mounted sprayer that sees the light of day once a year or a larger more modern trailed sprayer.
Even if your sprayer is in test, it is good practice to give it a once-over before use if occasionally used or throughout the working season if frequently used. On the other hand, if your sprayer is due to be tested, consider the tips below and have it tested.
Before examining the sprayer, ensure there is clean water in the spray tank for leak and nozzle test purposes.
Current regulations
Current regulations state that it is mandatory for any sprayer with booms 3m or larger and three years or older to be tested to ensure they are up to specification. Sprayers certified and tested during or prior to 2016 and 2017 are due to be tested this year. Going forward, testing remains valid for three years, so sprayers tested in 2022 will be due for testing again come 2025.
Tank and boom
Given the corrosive nature of some chemicals and liquid fertilisers, it is important to inspect the sprayer from a structural point of view to ensure there are no cracks or signs of severe corrosion. A sprayer that isn’t washed after use will inevitably rust much quicker. The tank in general should be assessed for leaks. If left for long periods in direct sunlight, tanks on older machines can become brittle.

Both the tank and boom should be inspected for cracks or damage.
On smaller sprayers without dedicated induction hoppers, check that the basket strainer is intact and that the lid incorporates a pressure compensation system. Also, any sprayer with a self-filler hose should be fitted with a functional non-return valve. The level gauge should be clean and visible from the cab.
It’s not uncommon for a sprayer’s boom to come into contact with an unintended object, so check that its sections are straight and that pivot points are as they should be, with no cracks. Standing behind the sprayer with the boom fully folded out, ensure that the boom is also sitting level. For a mounted sprayer to sit level, rear tyre pressure and lift arm height will need to be equal. Check also that boom break-back and that the height adjustment are also working. The hosing between boom sections and pivots should be checked for kinks.
Filters and pump
One of the next things to check on larger trailed sprayers especially is the main suction filter. Sprayers in regular use or being filled with water that isn’t pre-filtered should have their main filter washed on a daily basis. A simple rinse under clean water is all it takes. Gavin noted that the filter’s mesh can often become coated with a hazy residue which will need washing off if it doesn’t disappear with a blow of air. When it comes to remounting the filter housing, ensure the rubber seal is correctly in place, a rookie mistake that is a common occurrence, Gavin pointed out.
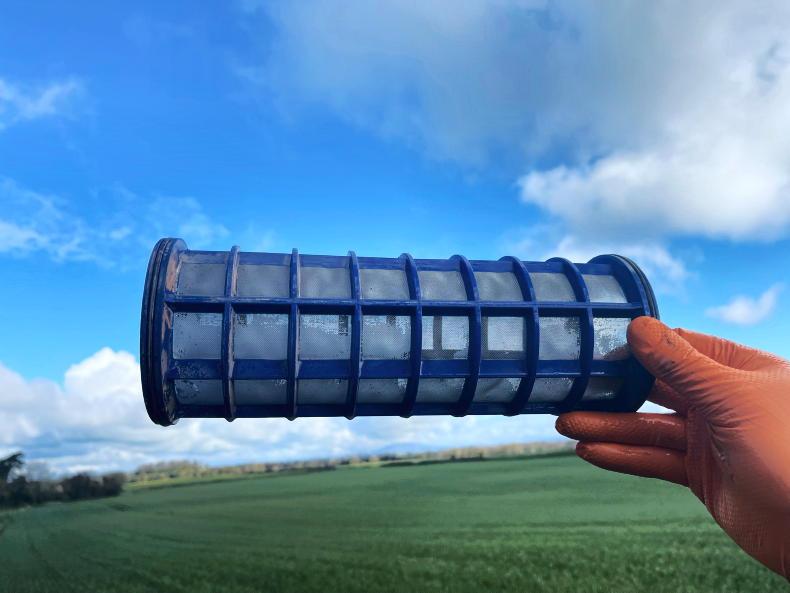
The main suction filter should be checked and cleaned regularly.
If fitted, inline boom filters should also be checked and rinsed. These tend to have a smaller mesh than the nozzle outlet to prevent any particles reaching and blocking the nozzle(s).
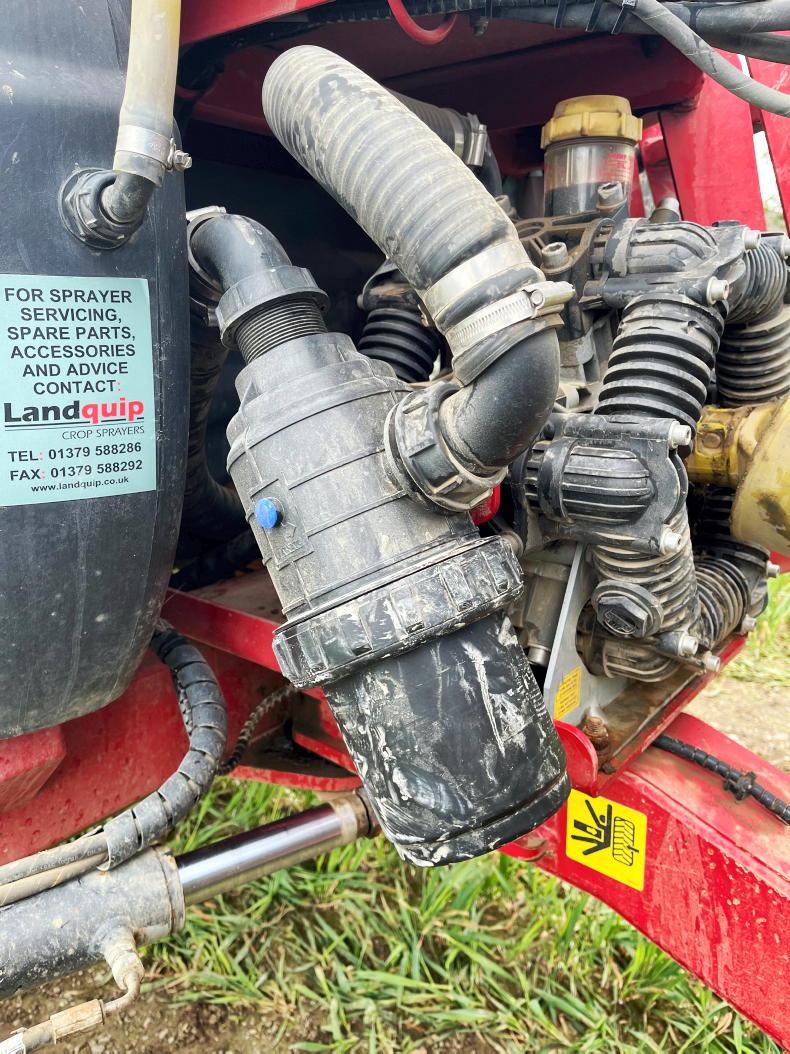
The suction filter housing needs to be correctly sealed or pressure losses will occur.
Before moving on to the pump, a functional PTO shaft cover should be in place. When it comes to testing, a sprayer with a damaged PTO cover will not be tested. Aside from checking oil level, a pump building sufficient pressure (5 bar) will tend to be in good order. If the pump is not building the correct pressure, rule out a pressure relief valve fault first.
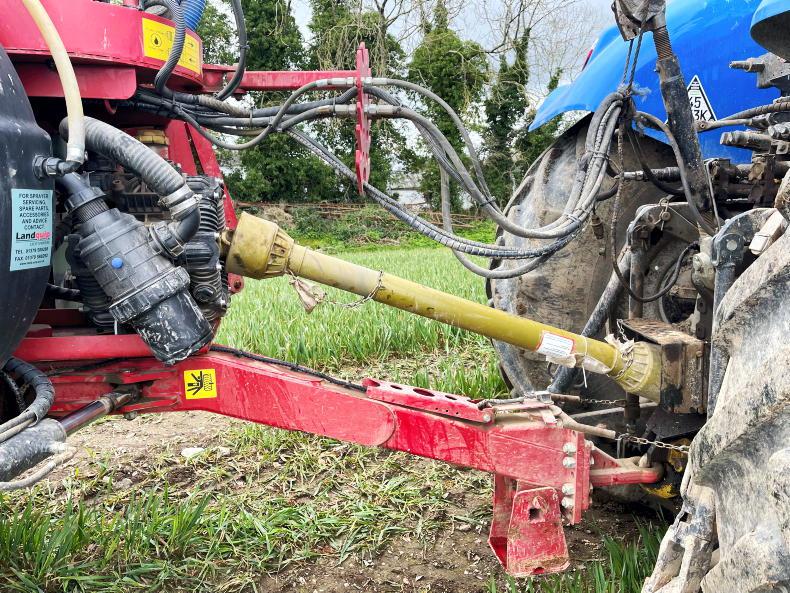
Every sprayer should be fitted with an intact and functional PTO cover.
Pressure relief valve and
induction hopper
The pressure relief valve is a safety device. Most sprayers are set to dump excess pressure over 6 bar and return spray to the tank. Gavin recommended that, once set, the relief pressure should not be changed. He said it is not uncommon for the spring within the pressure relief valve to break, causing low pressure and spray to also be returned to the tank.

Pump oil level should be checked.
Induction hoppers fitted on larger sprayers will need a check. Although there can be a misconception that induction is done via pump, it tends to be done via a Venturi which can occasionally fail or block.
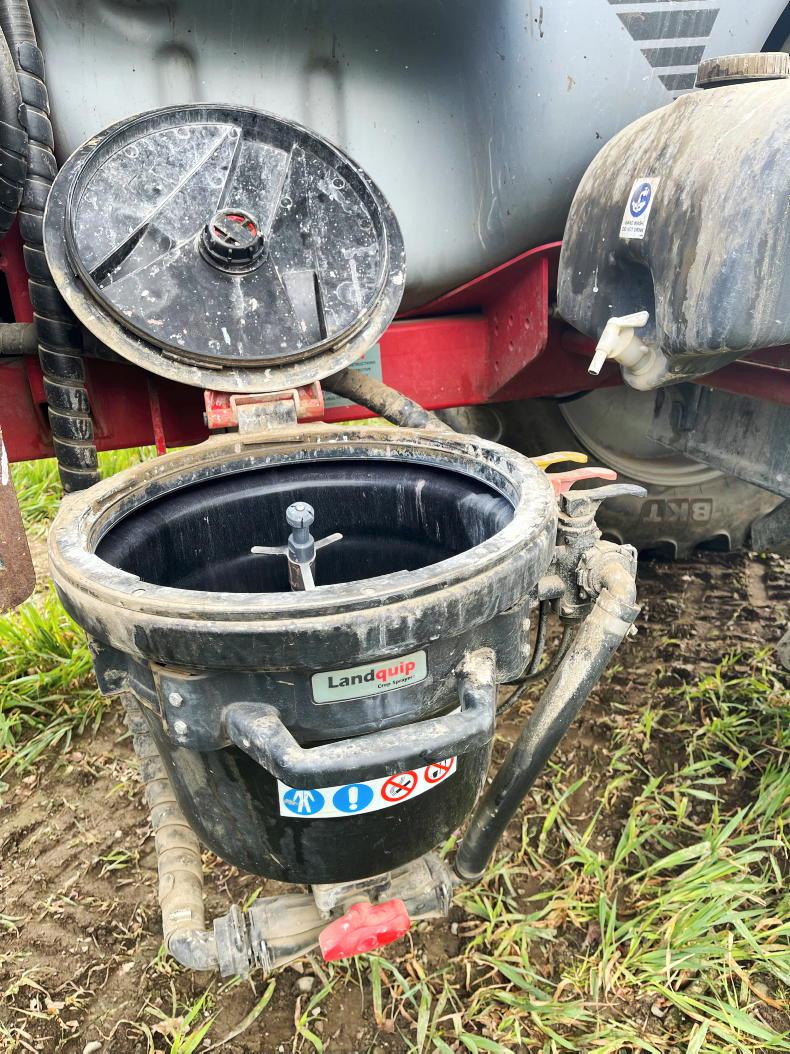
The induction hopper if fitted should be checked over that its Venturi is working correctly.
All induction hopper features and functions should be fully operational.
Where boom sections are manually controlled or electrically controlled, it is important to ensure all controls and functions are working properly.

If the sprayer is failing to build pressure a faulty pressure relief valve can be the cause.
Nozzles
Nozzles are the most important part of any sprayer. The nozzle type, working pressure and forward speed dictate the application rate. Once the target application is known, these variables can be worked out via nozzle chart or nozzle app. It is vital that variables remain constant for an even application. Most sprayers targeted for grassland are running 04 (red) and 05 (brown) flat fan nozzles.
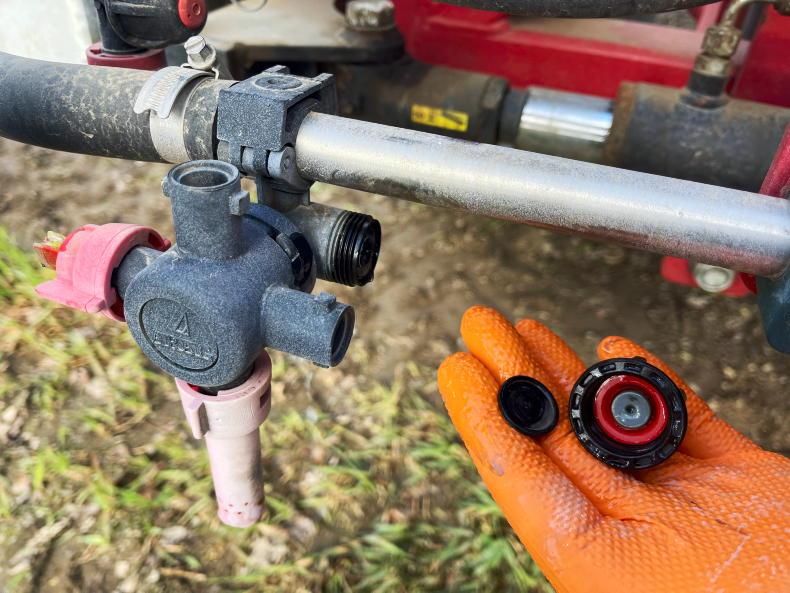
Leaking anti-drip nozzle holders may need their spring or rubber diaphragm replaced.
To determine nozzle output, fill the sprayer with water, set it to working pressure, and use a measuring jug to collect the output from an individual nozzle for exactly 30 seconds.
Repeat this with the other nozzles and calculate the average output per nozzle. When variation in output is greater than 10% of the rated output, nozzles should be replaced.
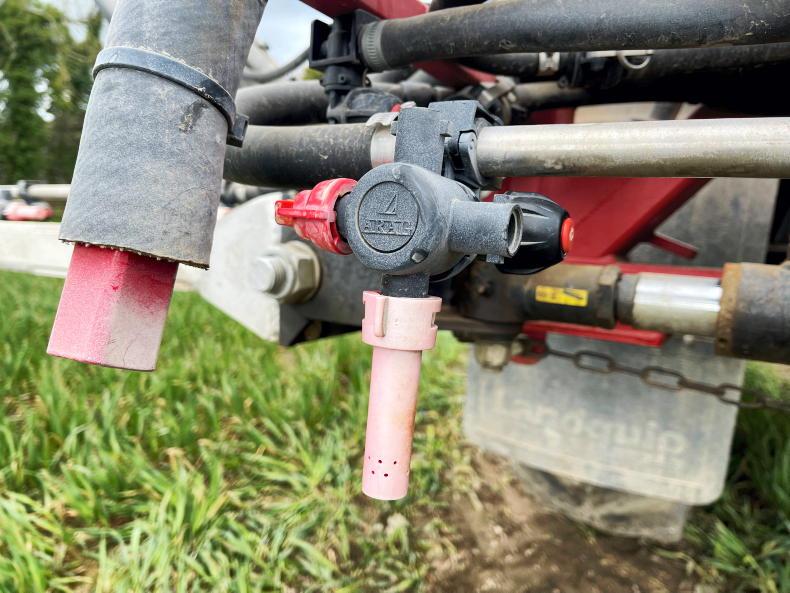
Dribble nozzles will need to be fitted for the majority of liquid fertilisers.
Those looking for better placement of chemical while being able to spray in more windy conditions should consider moving to low-drift nozzles. These work by incorporating air into the spray to create larger droplets, which are heavier and less prone to drift. The only arguable downside is that the finer droplets of flat-fan nozzles lead to better coverage in ideal conditions. However, this depends on the chemical being used.
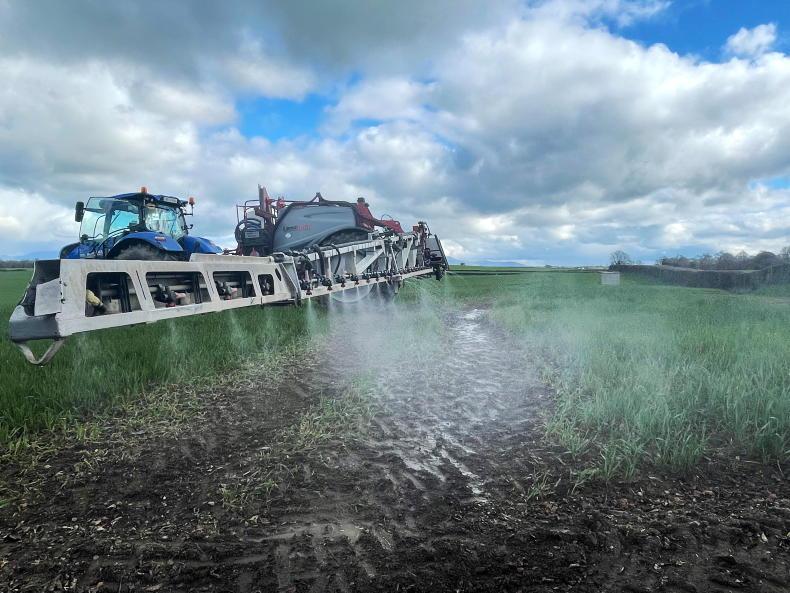
The difference in low drift (near) and standard nozzles (middle) can be visibly seen due to the smaller mist like droplets of flat fan nozzles.
Each nozzle’s anti-drip holder should be working properly and not drip below 0.5 bar. If leaking, the internal rubber seal or spring may need to be replaced. Leaking nozzles not only waste chemical but can cause unwanted striping in crops.
Prepping for liquid fertiliser application
As outlined in the introduction, many grassland farmers, especially, are resorting to liquid fertiliser for the first time this year based on cost mainly. However, spraying liquid fertiliser is not just as straightforward as filling up the tank and away you go.
Firstly, Gavin noted it is important to check that the machine in mind is compatible with liquid fertilisers. He also advises checking that the filter(s) are compliant with the manufacturer’s guidelines for liquid fertiliser too.
Given that most liquid fertilisers are designed to be placed on the soil and absorbed via the plants’ roots, different nozzles are required instead of the standard fan jet type.
Such nozzles create a large-sized droplet which is designed to hit the crop foliage and run off or down the stem to then be absorbed. If the fertiliser is applied in damp conditions or taken in by the root, it can lead to scorching of the plant. Depending on brand, Gavin outlined that these dribble nozzles will cost anywhere in the region of €14 plus VAT each, leaving a total cost of €280 plus VAT to convert a 10m sprayer.

Gavin Weldon, Wel-Tech, Louth.
Given the nozzle type and that liquid fertiliser tends to be slightly thicker and denser in comparison to most herbicides, higher application pressures will generally be required.
Gavin made the remark that it is crucially important to thoroughly rinse the sprayer after use, further noting to be mindful that there is nothing like liquid fertiliser to find leaks in an older sprayer.
This year, given the hike in fertiliser costs, many farmers are considering liquid fertiliser, especially on headlands due to precise nutrient placement right up to the field’s border. For many, liquid fertiliser also proves a cheaper option in comparison to granular fertiliser this spring.
As result, older sprayers have or are soon to be called upon, many of which may not be suitable for the task.
With that in mind, we caught up with Gavin Weldon of Wel-Tech, based in Ardee, Co Louth, to get some tips on general sprayer maintenance and some points to consider before setting your sprayer up for liquid fertiliser spraying. Aside from being main dealers for Landquip sprayers and Topcon Systems, Wel-Tech specialises in sprayer testing and service.
When it comes to sprayer maintenance, the basic principles remain the same regardless if it’s a simple mounted sprayer that sees the light of day once a year or a larger more modern trailed sprayer.
Even if your sprayer is in test, it is good practice to give it a once-over before use if occasionally used or throughout the working season if frequently used. On the other hand, if your sprayer is due to be tested, consider the tips below and have it tested.
Before examining the sprayer, ensure there is clean water in the spray tank for leak and nozzle test purposes.
Current regulations
Current regulations state that it is mandatory for any sprayer with booms 3m or larger and three years or older to be tested to ensure they are up to specification. Sprayers certified and tested during or prior to 2016 and 2017 are due to be tested this year. Going forward, testing remains valid for three years, so sprayers tested in 2022 will be due for testing again come 2025.
Tank and boom
Given the corrosive nature of some chemicals and liquid fertilisers, it is important to inspect the sprayer from a structural point of view to ensure there are no cracks or signs of severe corrosion. A sprayer that isn’t washed after use will inevitably rust much quicker. The tank in general should be assessed for leaks. If left for long periods in direct sunlight, tanks on older machines can become brittle.
Both the tank and boom should be inspected for cracks or damage.
On smaller sprayers without dedicated induction hoppers, check that the basket strainer is intact and that the lid incorporates a pressure compensation system. Also, any sprayer with a self-filler hose should be fitted with a functional non-return valve. The level gauge should be clean and visible from the cab.
It’s not uncommon for a sprayer’s boom to come into contact with an unintended object, so check that its sections are straight and that pivot points are as they should be, with no cracks. Standing behind the sprayer with the boom fully folded out, ensure that the boom is also sitting level. For a mounted sprayer to sit level, rear tyre pressure and lift arm height will need to be equal. Check also that boom break-back and that the height adjustment are also working. The hosing between boom sections and pivots should be checked for kinks.
Filters and pump
One of the next things to check on larger trailed sprayers especially is the main suction filter. Sprayers in regular use or being filled with water that isn’t pre-filtered should have their main filter washed on a daily basis. A simple rinse under clean water is all it takes. Gavin noted that the filter’s mesh can often become coated with a hazy residue which will need washing off if it doesn’t disappear with a blow of air. When it comes to remounting the filter housing, ensure the rubber seal is correctly in place, a rookie mistake that is a common occurrence, Gavin pointed out.
The main suction filter should be checked and cleaned regularly.
If fitted, inline boom filters should also be checked and rinsed. These tend to have a smaller mesh than the nozzle outlet to prevent any particles reaching and blocking the nozzle(s).
The suction filter housing needs to be correctly sealed or pressure losses will occur.
Before moving on to the pump, a functional PTO shaft cover should be in place. When it comes to testing, a sprayer with a damaged PTO cover will not be tested. Aside from checking oil level, a pump building sufficient pressure (5 bar) will tend to be in good order. If the pump is not building the correct pressure, rule out a pressure relief valve fault first.
Every sprayer should be fitted with an intact and functional PTO cover.
Pressure relief valve and
induction hopper
The pressure relief valve is a safety device. Most sprayers are set to dump excess pressure over 6 bar and return spray to the tank. Gavin recommended that, once set, the relief pressure should not be changed. He said it is not uncommon for the spring within the pressure relief valve to break, causing low pressure and spray to also be returned to the tank.
Pump oil level should be checked.
Induction hoppers fitted on larger sprayers will need a check. Although there can be a misconception that induction is done via pump, it tends to be done via a Venturi which can occasionally fail or block.
The induction hopper if fitted should be checked over that its Venturi is working correctly.
All induction hopper features and functions should be fully operational.
Where boom sections are manually controlled or electrically controlled, it is important to ensure all controls and functions are working properly.
If the sprayer is failing to build pressure a faulty pressure relief valve can be the cause.
Nozzles
Nozzles are the most important part of any sprayer. The nozzle type, working pressure and forward speed dictate the application rate. Once the target application is known, these variables can be worked out via nozzle chart or nozzle app. It is vital that variables remain constant for an even application. Most sprayers targeted for grassland are running 04 (red) and 05 (brown) flat fan nozzles.
Leaking anti-drip nozzle holders may need their spring or rubber diaphragm replaced.
To determine nozzle output, fill the sprayer with water, set it to working pressure, and use a measuring jug to collect the output from an individual nozzle for exactly 30 seconds.
Repeat this with the other nozzles and calculate the average output per nozzle. When variation in output is greater than 10% of the rated output, nozzles should be replaced.
Dribble nozzles will need to be fitted for the majority of liquid fertilisers.
Those looking for better placement of chemical while being able to spray in more windy conditions should consider moving to low-drift nozzles. These work by incorporating air into the spray to create larger droplets, which are heavier and less prone to drift. The only arguable downside is that the finer droplets of flat-fan nozzles lead to better coverage in ideal conditions. However, this depends on the chemical being used.
The difference in low drift (near) and standard nozzles (middle) can be visibly seen due to the smaller mist like droplets of flat fan nozzles.
Each nozzle’s anti-drip holder should be working properly and not drip below 0.5 bar. If leaking, the internal rubber seal or spring may need to be replaced. Leaking nozzles not only waste chemical but can cause unwanted striping in crops.
Prepping for liquid fertiliser application
As outlined in the introduction, many grassland farmers, especially, are resorting to liquid fertiliser for the first time this year based on cost mainly. However, spraying liquid fertiliser is not just as straightforward as filling up the tank and away you go.
Firstly, Gavin noted it is important to check that the machine in mind is compatible with liquid fertilisers. He also advises checking that the filter(s) are compliant with the manufacturer’s guidelines for liquid fertiliser too.
Given that most liquid fertilisers are designed to be placed on the soil and absorbed via the plants’ roots, different nozzles are required instead of the standard fan jet type.
Such nozzles create a large-sized droplet which is designed to hit the crop foliage and run off or down the stem to then be absorbed. If the fertiliser is applied in damp conditions or taken in by the root, it can lead to scorching of the plant. Depending on brand, Gavin outlined that these dribble nozzles will cost anywhere in the region of €14 plus VAT each, leaving a total cost of €280 plus VAT to convert a 10m sprayer.
Gavin Weldon, Wel-Tech, Louth.
Given the nozzle type and that liquid fertiliser tends to be slightly thicker and denser in comparison to most herbicides, higher application pressures will generally be required.
Gavin made the remark that it is crucially important to thoroughly rinse the sprayer after use, further noting to be mindful that there is nothing like liquid fertiliser to find leaks in an older sprayer.


SHARING OPTIONS